
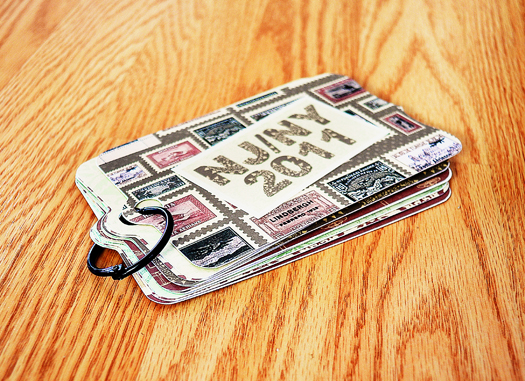
Well Traveled Mini Travel Album
More fun to inspire you today! Check out Creative Team member Laurel Flechtner’s tutorial for creating a Mini Travel Album!
Enjoy! Carina
Mini Travel Album
NAME Laurel Flechtner
FROM Norfolk, Virginia, USA
WHAT INSPIRED YOU TO MAKE THIS PROJECT OR WHO DID YOU MAKE IT FOR? We took a trip to NJ & NYC to see family and I always make mini-albums of each of our trips.

MATERIALS
Carina Gardner Well Traveled Paper Set 1
Carina Gardner Well Traveled Paper Set 2
Carina Gardner Well Traveled Paper Set 3
Carina Gardner Well Traveled Paper Set 4
7 Gypsies black binder ring
Cricut & Sure Cuts A Lot 2 for cutting album pages
Adobe Photoshop CS5
INSTRUCTIONS
1. Cut and adhere a front and back paper for each page of the album.

2. Select, print and adhere photos

3. Add embellishments and journaling

Well Traveled Mini Travel Album Read More »


 Check out my bike basket tutorial on


 It’s taken me a little longer than I wanted it to, but here it is! Instructions for putting together the


 Yes, my daughter wanted me to make her an octopus costume for her birthday. So how could I refuse? I kept it simple by buying a t-shirt (with the gems already on it) and women’s long socks. Add some filling, a t-shirt transfer kit and my sewing machine and I was set. The only problem? Once I made one for my oldest daughter, I had to make a second one for my youngest daughter. Thankfully, it’s project that can be done in a couple of hours.


 1. I bought a package of Dark T-shirt transfers and a few t-shirts in blue and dark pink. I picked them all up at Target but many places would have these goods.


 It is a season of change at our house. Our oldest daughter started Kindergarten, Josh started a new job a couple of months ago, I recently signed a fabric contract, and we are buying our very first home. It’s a wonderful time, but difficult to say the least. Labor Day Weekend and this week has been particularly hectic as I have been working on a paper and fabric line (collection number 3!) and convention season is upon me (my day job as an event director). And with the move coming up, I’ve been busy getting rid of the old and getting organized.
 You’ll notice that I added a bit of artwork to these tags because with little ones cleaning up is easier if there are pictures. So I added words for the adults and pictures for the kids. I am hoping this means that it will be easier to tidy up.
 We’re getting started a bit early here (Project Mania officially starts on September 1st!), but I wanted to make sure that everyone has a chance to participate! I’m giving everyone a head start here so that if you have any big projects that need starting or need to clear out your schedule to make way for some great projects in September, you have the time to!

 I finally got around to upgrading my sidebar. I’ve been meaning to add these easy links for a while now, but just managed to squeeze in making the icons and putting it all up this morning! I still have to make some adjustments to the posts themselves (so some things can be downloaded directly from this site), but for now I’m just happy to have this up! You can now click on these links: free downloads, (the ever-so-popular) favorite fridays, tutorials, and giveaways. Check it out on the right-hand side!
 I just wanted to give you a preview of the line coming in two weeks! I’m so excited about it because it will be a photographers tool set! These digital kits will be SO much more useful than for just scrapbooking…it will include overlays, masks, filmstrips, and frames of all kinds. It’s the kind of set that will really be useful for any type of photography! So the countdown is just 2 weeks away….


