Learn more here: https://carinagardner.com/carina-gardner-tv/2017-block-of-the-month/
Category: Tutorials
from photoshop to projects…find your tutorials here!
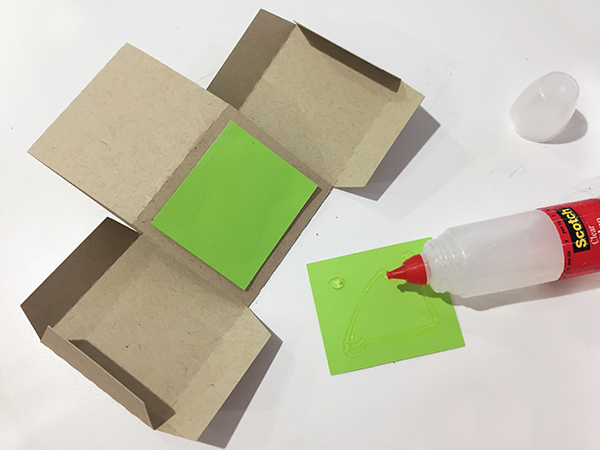
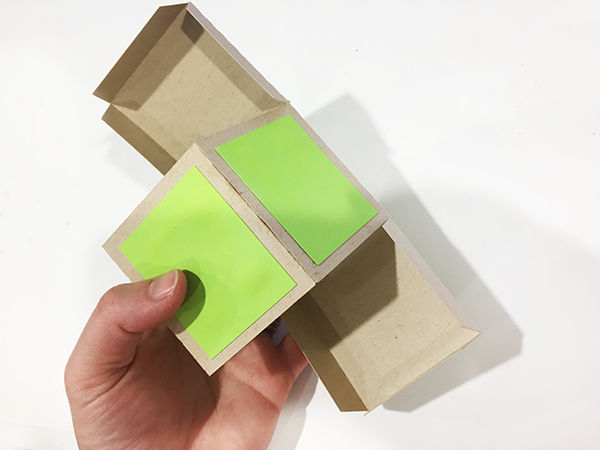
Flat Folding 3D Boxes Tutorial
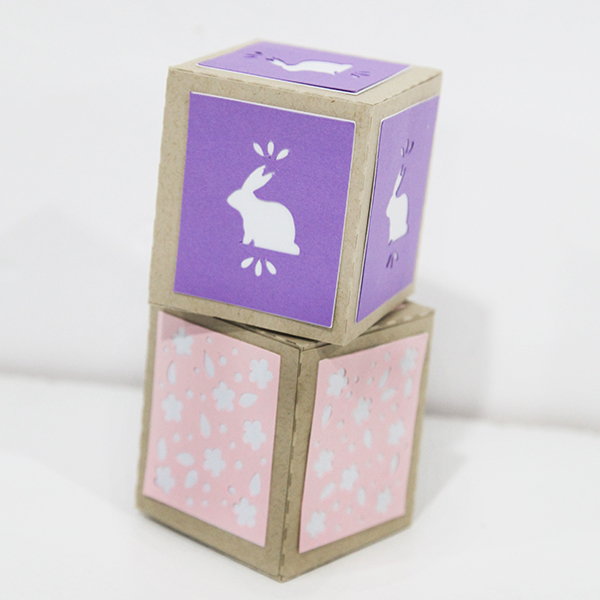
I’m loving anything that folds down flat (so I can actually keep it!) these days. These foldable boxes are easy to put together. You can find them in my Silhouette SHop here: https://www.silhouettedesignstore.com/artists/252689
Instructions:
1. Cut out all pieces in your file.
2. If you have layered accent pieces, glue these together first ( for example, a bunny overlay on a white background).
3. Then fold up all the edges of the box. Glue together the inside flap to create the main body of the box.
4. Glue on the accent pieces.
5. Fold the box top and bottom up and slide into place. You do NOT have to glue the top and bottom on.
Happy Crafting!
Carina
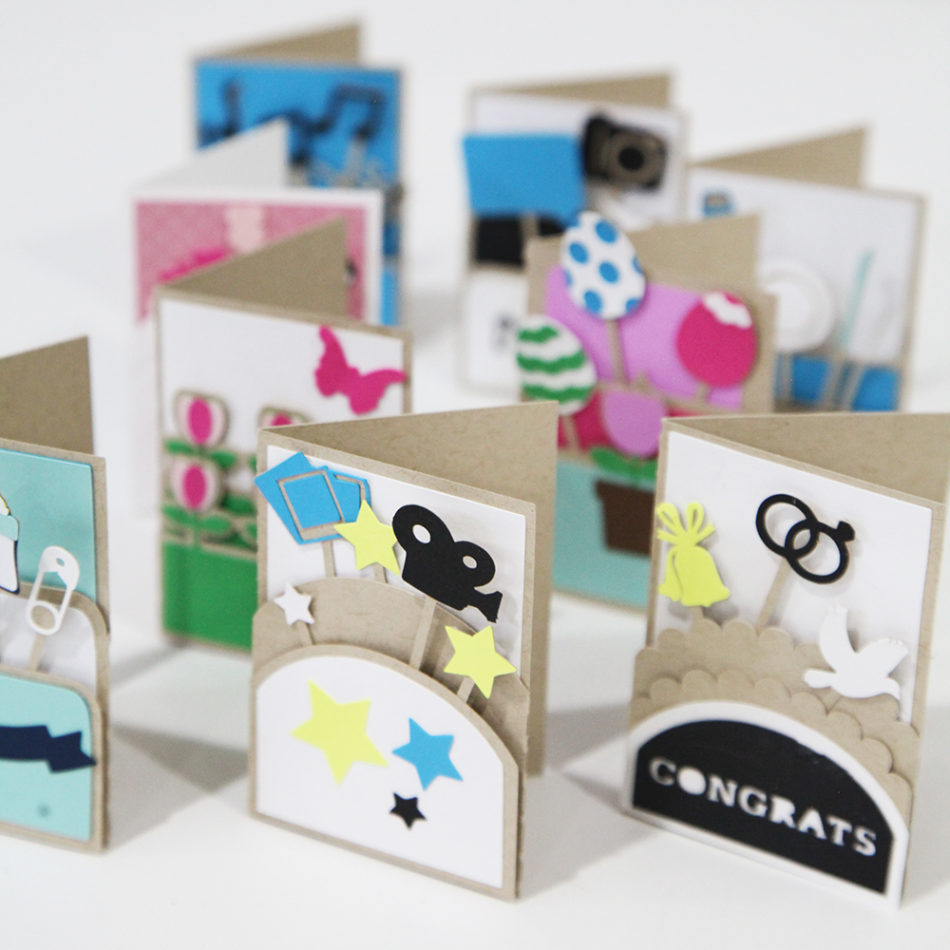
2.25 in. x 3.25 in. Layered Cards and Envelopes on Silhouette
This week my Silhouette release continues with 2.25 in. x 3.25 in. cards. I’m really loving this size! This week the cards are “layered.” I cover a lot of different themes—wedding, baby, spring to name a few. These Layered Cards are the same size as my Accordion Shadow Box Cards that were released last week. Because of this, I also have envelopes that match up to these cards.
I also have two videos below that will help you make these cards and envelopes. Please subscribe to the youtube channel if you are interested in these tutorials. Many times I am putting up these videos the week before the products are released so you can see what is coming out (your very own sneak peek!)
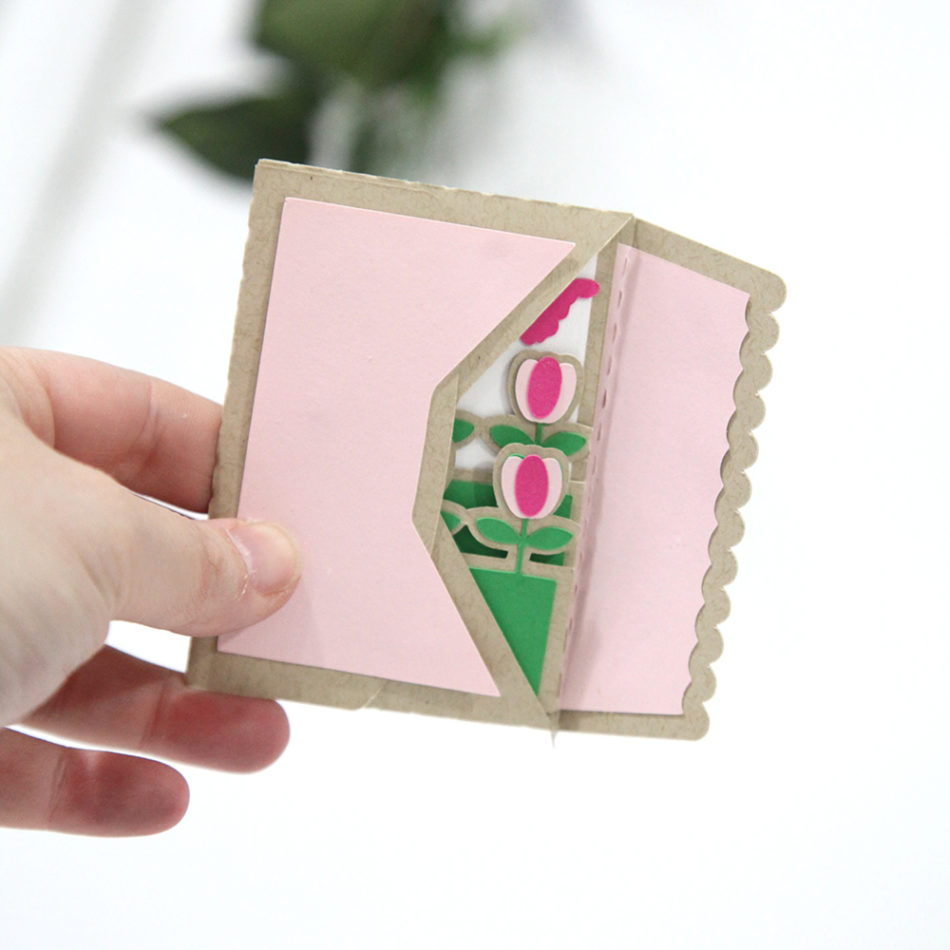 If you get one of each (layered card or accordion card + an envelope), you will find that it’s a very nice tight fit. Don’t use pop dots because the card will not fit. I may have an envelope come out that allows for a thicker card (tell me on instagram @carinagardnerpapercrafts if you want something like that!).
Happy Crafting!
Carina
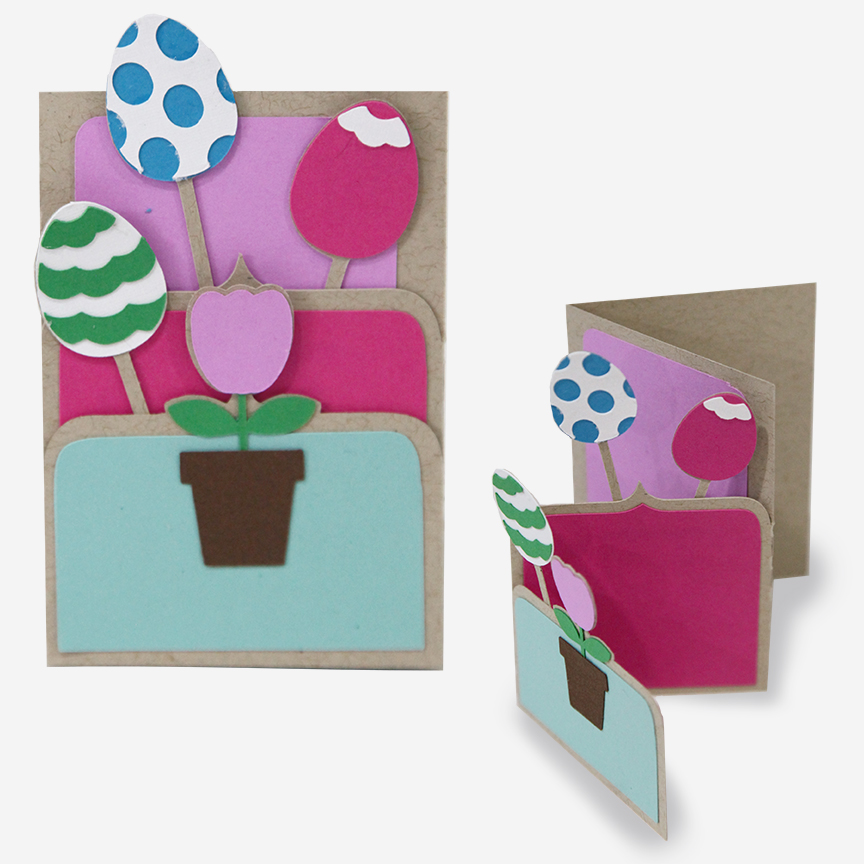
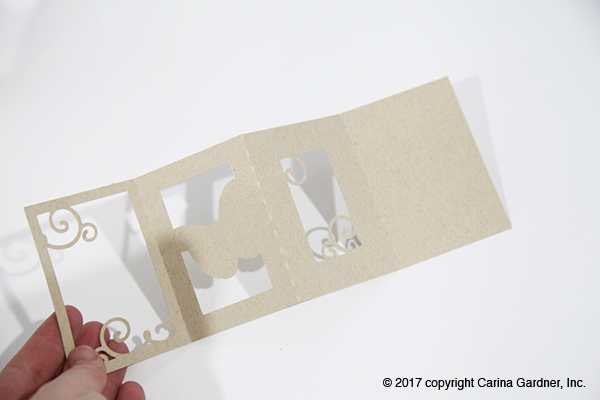
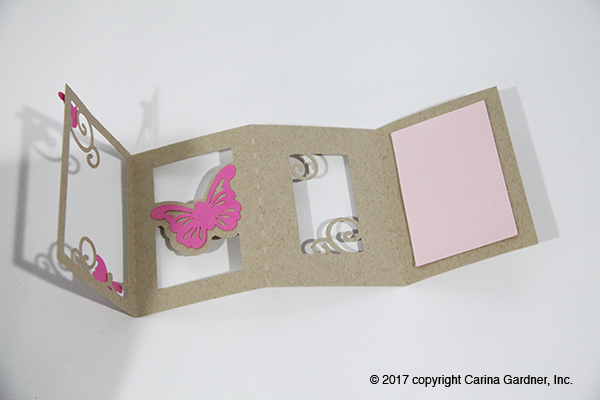
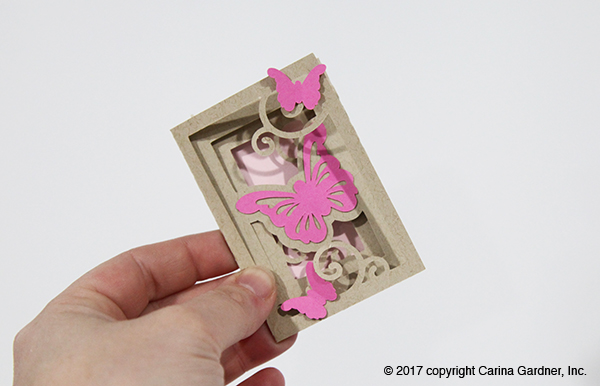
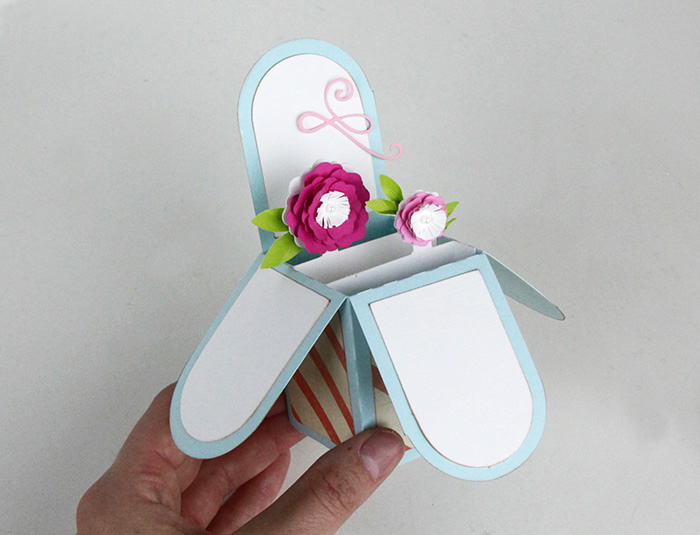
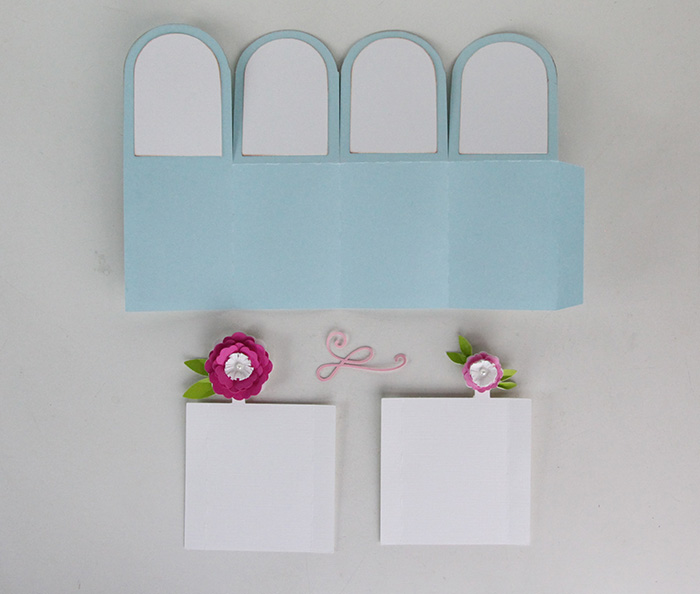
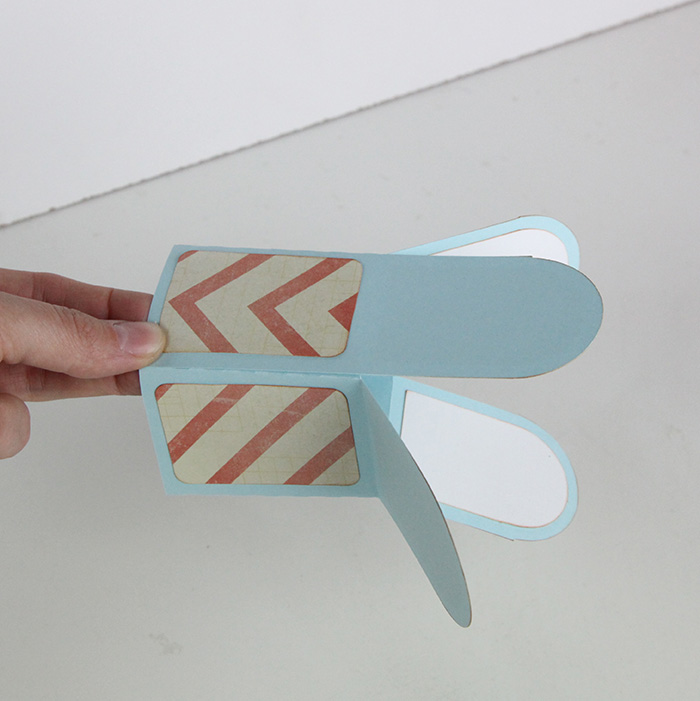
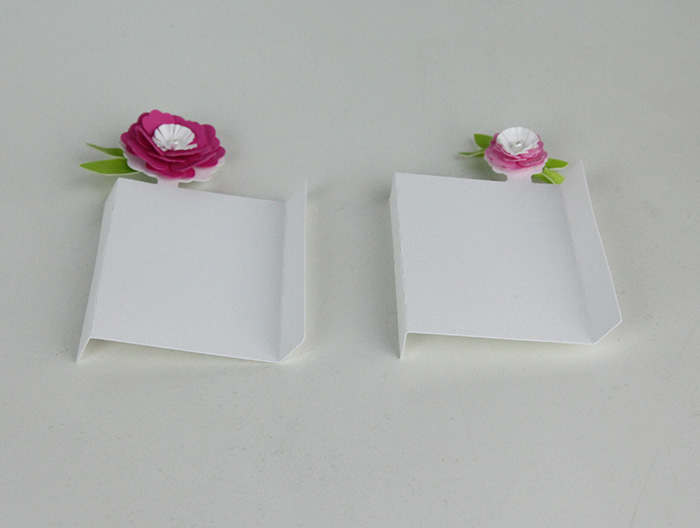
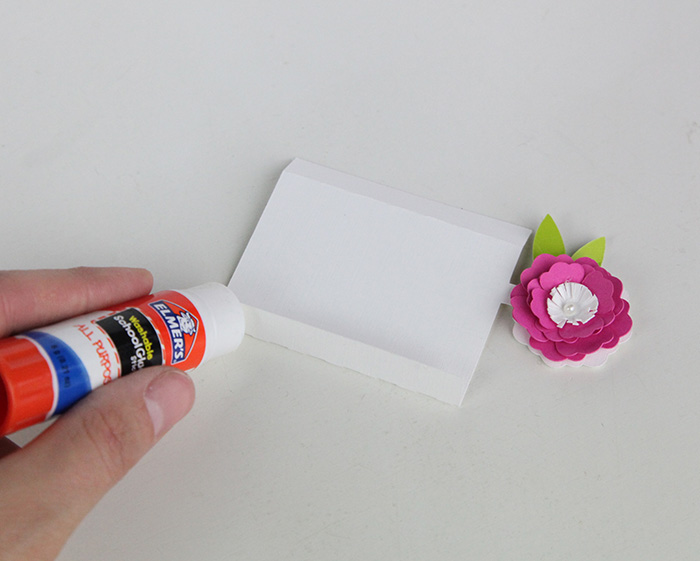
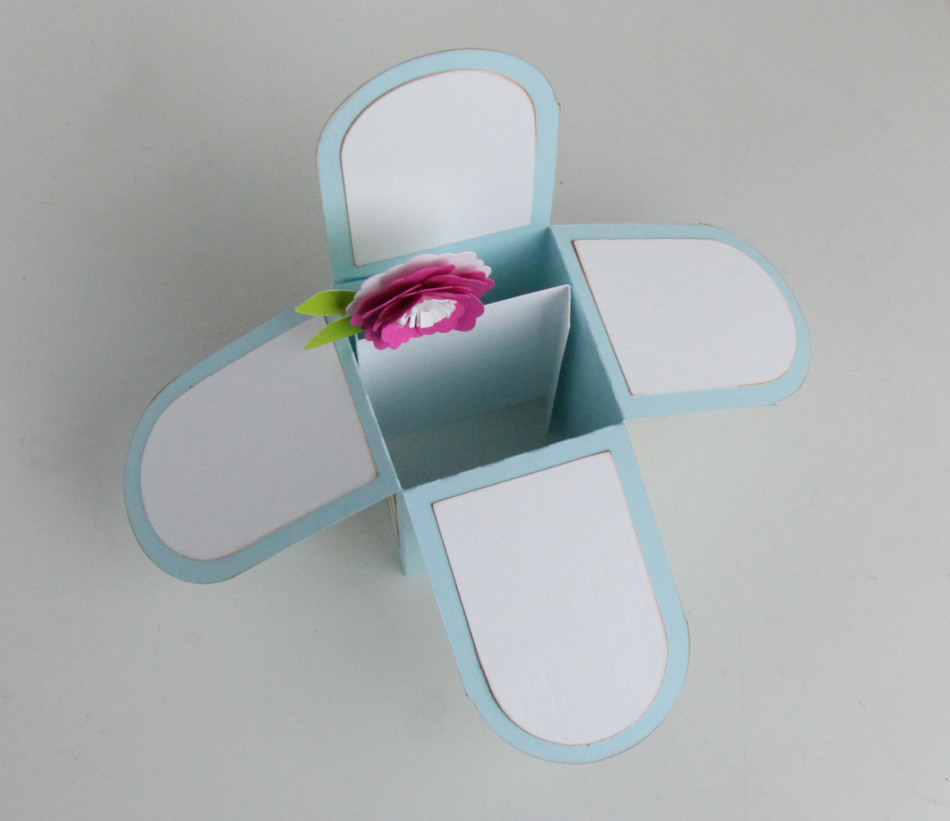
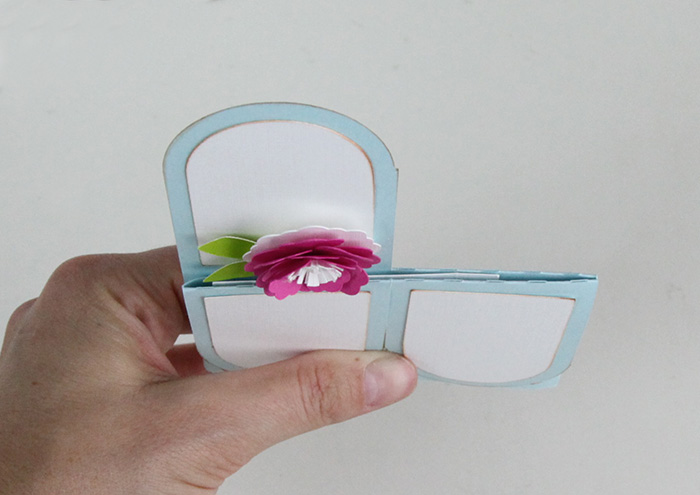
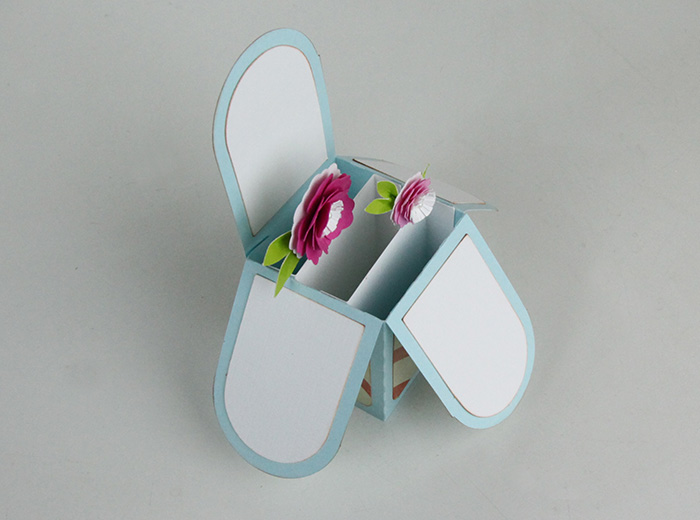
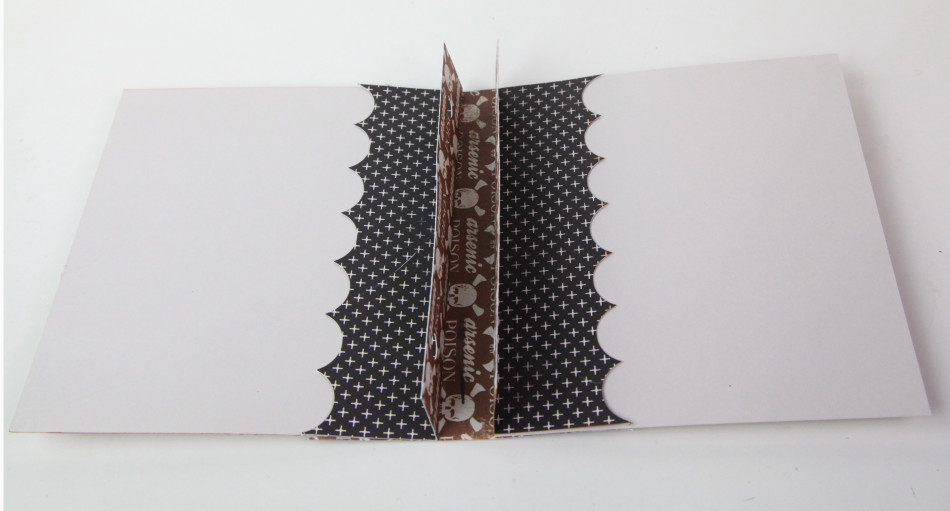
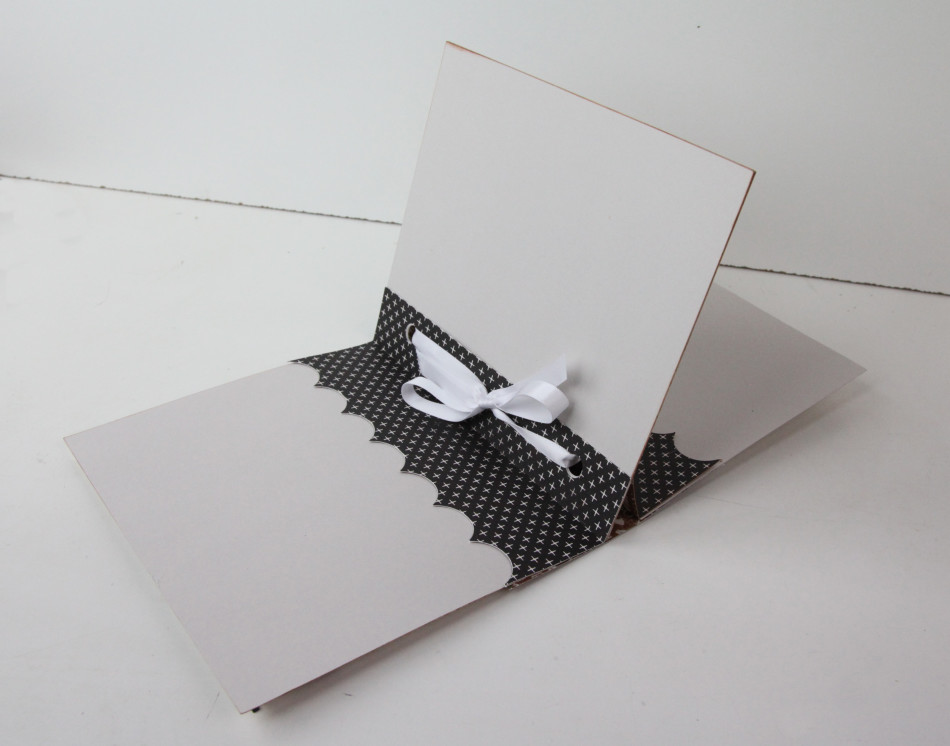
Accordion Shadow Box Card Tutorial for Silhouette
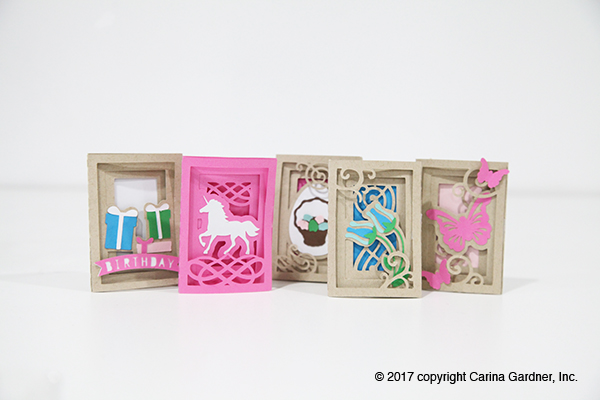
This week I am releasing these cool Accordion Shadow Box Cards! They fold flat and are so sweet. Cards are sized to 2.25 in. x 3.25 in. and can be cut on a portrait or cameo. There are 4 folds with layers of goodness! See how I put it together in the video below OR check out my quick instructions below. These are in my Silhouette Shop: https://www.silhouettedesignstore.com/artists/252689
***EDIT: Some of the Design IDS for this line is Design ID #187756, Design ID #187753, Design ID #187750, Design ID #187747, Design ID #187744, Design ID #187741, Design ID #187735, Design ID #187729, Design ID #187726, and Design ID #187717.
Happy Crafting!
Carina
PS Make sure and subscribe to my youtube channel because this it the first of many videos that I am doing in this new format! I’m hopeful that you will be able to see clearly what I am doing!
Instructions
- Cut out all the pieces in the file.
- Fold the main card piece into an accordion shape.
3. Glue all the extra pieces into place using the preview photo as your guide. For items like flowers or butterflies, finger press to give dimension. Be sure to use the folded accordion card to decided where pieces should go so you do not mistakenly add pieces to the wrong side of the card.
February & March Posy Garden Block of the Month


I think I managed to forget to do a post on Block of the Month for February so I’m doing double duty today!
I’m a bit late, but March block of the month is finally up! We had some technically difficulties over the last few days with the website so I’m so happy everything seems to be resolved with our hosting company.
March’s video is a bit long but hopefully helps all of you beginners put together this video. If you can’t tell, I had fun making it (wink, wink). The downloads are all available in the shop for free (as per usual). I use Posy Garden fabric (with minky on the back for Felicity), but you can make it in any fabric you want. Felicity and I also tested a portion of the inside of this quilt with Primrose Garden (I’ll make sure to post a pic soon on Facebook).
Hope you have fun making it!!!!
XOXO- Carina
February 2017 BLOCK VIDEO
Grab the FEBRUARY DOWNLOAD here.
March 2017 BLOCK VIDEO
Grab the MARCH DOWNLOAD here.
Carina Gardner’s Best Little Album for Silhouette and SnapClickSuppy.com
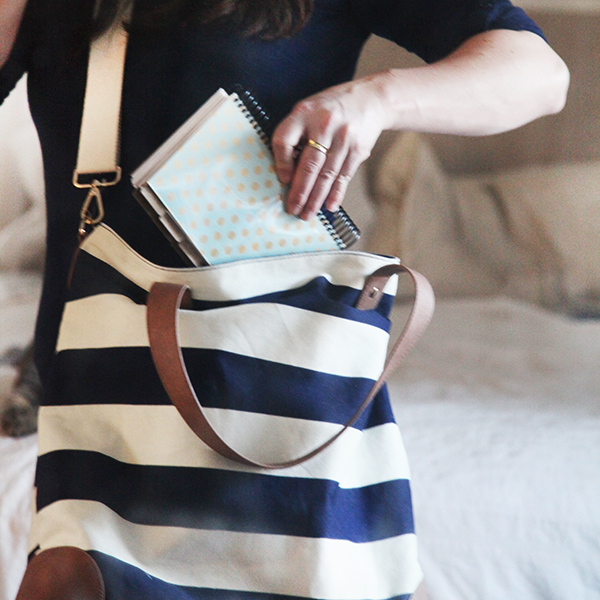
This week I’m leaving for long anticipated trip. It’s been a tough week with a lot of sickness and big news so the timing of this trip couldn’t be better. If you want to see what I am doing, I’ll be posting to all three of my feeds depending on where I am: @carinagardner @carinagardnerpapercrafts @miniloukids.
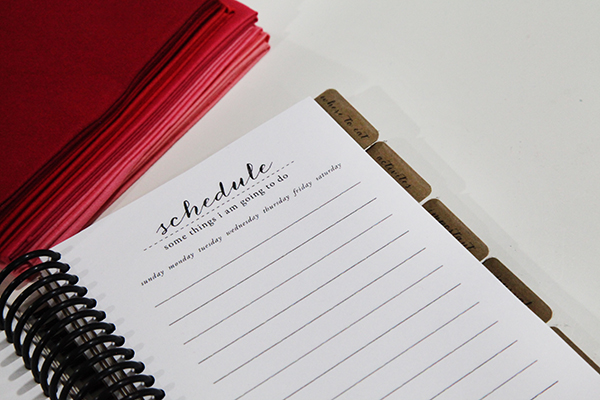
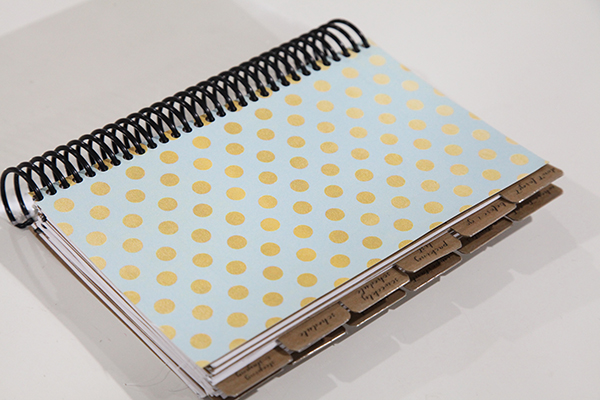
I always make myself a travel book for a trip like this ( think my Hong Kong trip for MiniLou) and this time wasn’t any different. This time, I wanted everything to be tabbed and easy to get to, so I used my Silhouette machine to cut out this book. I did however, get this SPIRAL BOUND instead of using the holes I made for my cutting files. Why? Because I like pre-made holes for regular album making. But for a trip, I think you need a sturdy spiral bound so you can really use the book. Printables are available on Silhouette OR you can also wait until I release them the first week in March for Digital Scrapbooking.
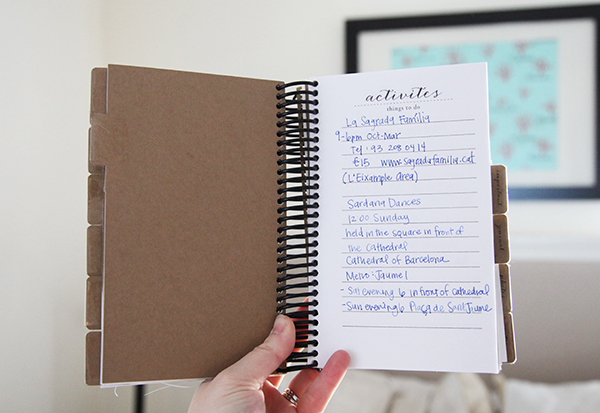
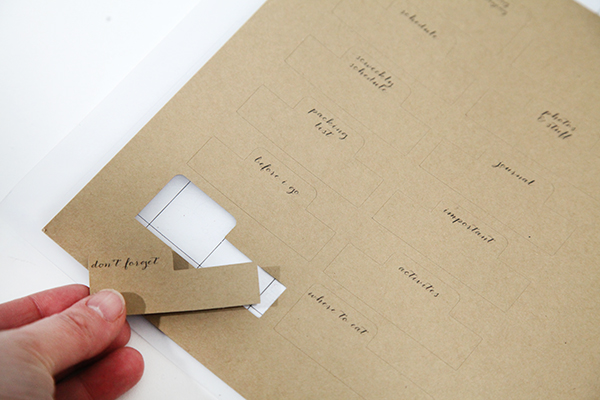
I call this the “Best Little Album” because I’ve gone out of my way to make it SO simple that it would work for your trip to Florida as well as a trip to Europe. You can pick and choose from the 12 printables that correlate with the 6 tab system (so you cut out 12 tabs in all). You can also pick from printable or cut-able covers I’ve provided as well as pockets and accessories. The point is that every piece should work seamlessly so you can mix and match to your hearts content. I know I did.
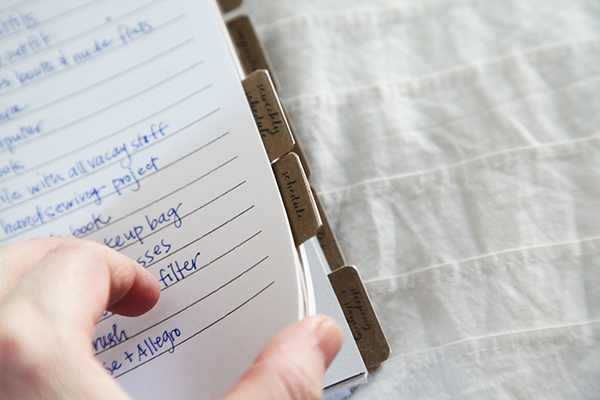
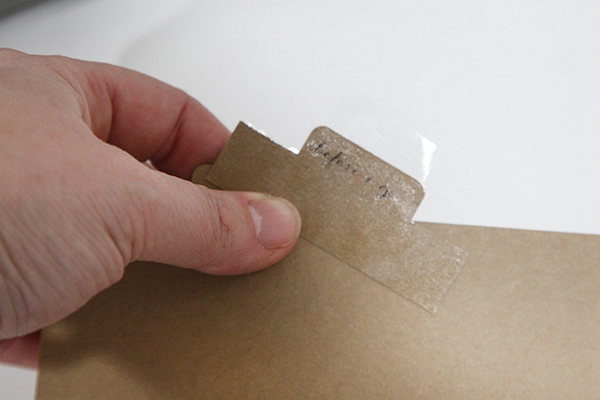
For the tabs, the printable is in a separate “tab” file so you can cut tabs out on mutli-colored paper. I’m sure I’ll do that in future travel books but for this one, I decided to go all kraft paper.
I also “laminated” the tabs with moving tape. Sturdiness is important! There’s nothing worse than having a tab break off midway through a trip or even later when your kids are handling them to look at it photos.
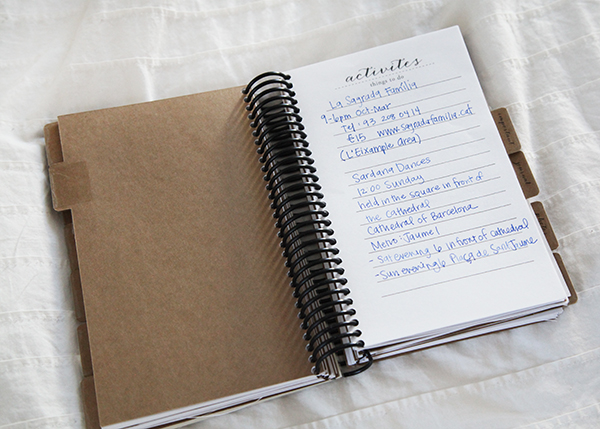
My travel albums are always dual purpose. They contain everything we are going to do, addresses, directions, places to eat, flight information, as well as a journal and a place for photos. That way I don’t have to come home from a trip and “scrapbook it.” It’s done. I staple in tickets to events, museums, and instax photos. I’ll come home and print a few and glue them into the remaining pages. Done and done.
Maybe you can guess where I’m going from the activities I wrote here (wink, wink).
Search “BEST LITTLE ALBUM” under my Silhouette Artist name to find the entire collection of these! I promise you’ll use this one again and again!
XOXO, Carina
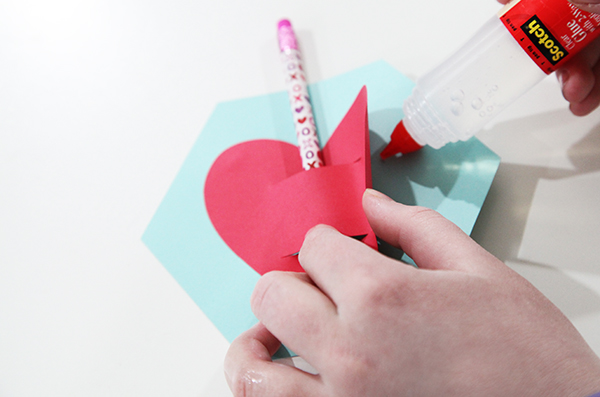
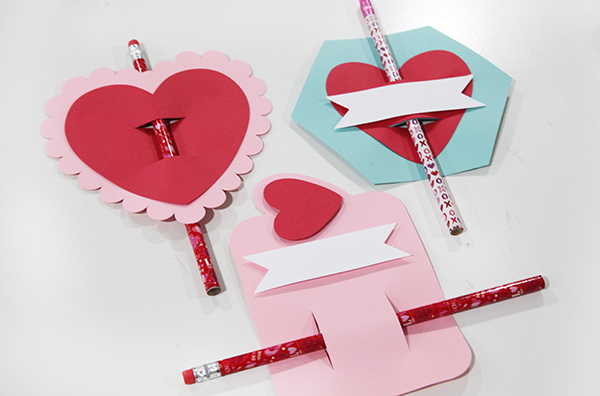
Kids Pencil Valentine Cards
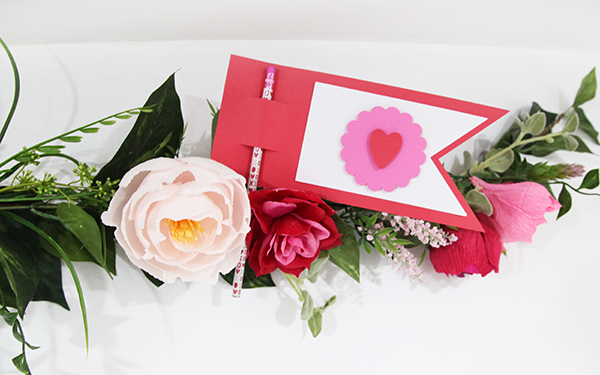
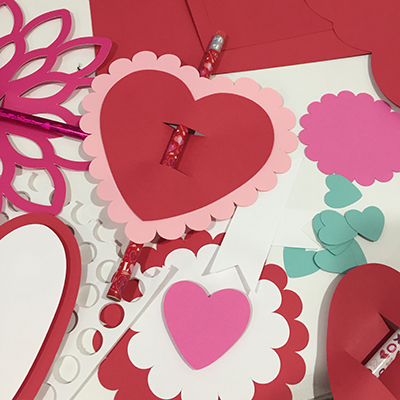 This week is the last one I’ll be releasing Valentine’s so I’m going out with a bang! I also decided to double dip. These pencil cards are not only my final Valentine’s release but are also Felicity’s class gifts. She’s going to write on each of them, and I’m sure we’ll add a few quotes like “I’m write for you.”
You can find them in my Silhouette shop here.
TIP 1: When you are putting these together, I recommend putting your pencil through the slits FIRST and then gluing your pieces into place (see photo below).
There are several designs were two or more papers have slits that match up. Use the slits as your guides. Place the pencil through the slits first and then pull open the edges of the top paper to glue it into place.
TIP 2: I LOVE pop dots with these designs! And glitter. And stamping ink on the edges. I kept them all simple on purpose. So you can jazz them up or use them as a kid activity.
TIP 3: Add a printable. Simply use whatever word processing software you use and write up a cute phrase in a cute font. Print, cut and attach to these Valentine’s cards!
And in case you missed it (haha), I’ve been releasing Valentine’s for the last month. In fact, we have been releasing Valentine’s for both CGInc. and MiniLou for the past several weeks. You can check both shops here:
Carina Gardner Silhouette Shop
Happy crafting!
Carina
Carina Gardner’s 2017 Block of the Month
I’m so excited to introduce the 2017 Block of the Month Quilt! I’ve posted the introduction to this year’s block of the month below along with the January video! As always, you will be able to access everything on my 2017 BLOCK OF THE MONTH PAGE. That page is updated monthly with all the videos and download links you need! Check out the quilt we will be making!
INTRODUCTION
MATERIALS
This is a scrappy quilt and you can make it from scraps OR purchase a fat quarter pack to cut your blocks. You can start with me in January or anywhere along the way. I am using my line Posy Garden for Riley Blake in this quilt. Download all the cutting and fabric requirements here:
https://carinagardner.com/store/?model_number=2017bomjanuary
INSTAGRAM
Want to become part of my instagram (@carinagardner) community? Sew with me every month and hashtag #carinagardner the photo of your monthly block so I can see what you are making!
January 2017 BLOCK VIDEO
Grab the JANUARY DOWNLOAD here.
Six Carina Gardner Free Fabric Projects You Might Have Missed
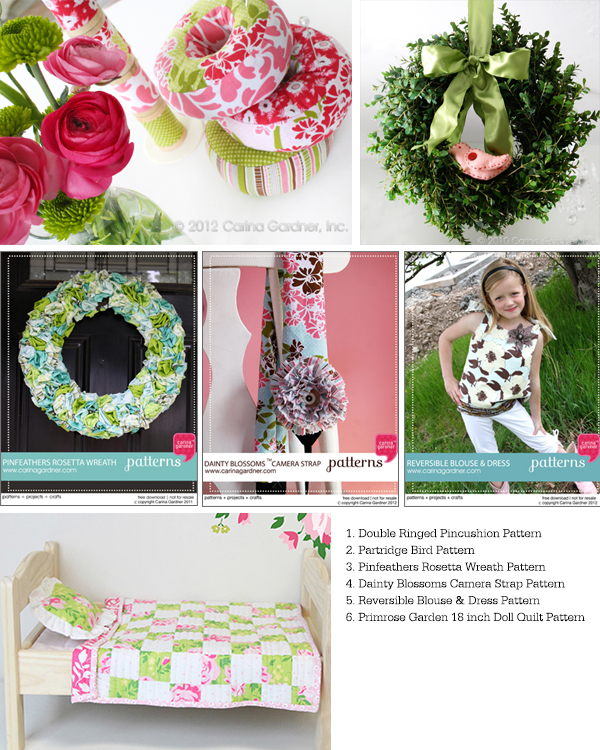
I posted on instagram the other day a picture of Felicity watching my cut out fabric for my 2017 Block of the Month. It reminded me that I wanted to put together a list of the SIX FREE FABRIC PROJECTS you might have missed.
- Double Ringed Pincushion Pattern (also known as the Donut Pattern!)
- Partridge Bird Pattern
- Pinfeathers Rosetta Wreath Pattern
- Dainty Blossoms Camera Strap Pattern
- Reversible Blouse & Dress Pattern
- Primrose Garden 18 inch Doll Quilt Pattern
Hope you get a chance to download all of these!
Happy Sewing!
XOXO- Carina
2017 Tutorial Tuesdays for 99 cents!
![]() I’m so excited to announce that this year I’m introducing a Tutorial Tuesday! Every Tuesday you will see a new 5-10 minute tutorial on one of my favorite programs (illustrator, indesign, photoshop, silhouette software), a sewing technique or some other crafty goodness.
I’m so excited to announce that this year I’m introducing a Tutorial Tuesday! Every Tuesday you will see a new 5-10 minute tutorial on one of my favorite programs (illustrator, indesign, photoshop, silhouette software), a sewing technique or some other crafty goodness.
Each tutorial will go up on Tuesdays for the introductory price of 99 cents! Isn’t that a steal of a deal? Wednesday they will go to their normal price of $2.99. So get it while it’s hot!
I’m excited for the very first tutorial, which is an Illustrator Tutorial (you know me, I can’t help teaching a little Illustrator!). I show you how to make a scalloped tag and I highlight the following things:
• The Ellipse Tool
• The Pattern Brush Tool
• Using the Fill and Stroke
• Changing colors
• Expanding Objects
• Trimming and Uniting Objects
• Arranging Objects (Front, Back, ect)
• Ungroup Objects
What you will need for this lesson:
• Illustrator CS3, CS4, CS5, CS6, or Cloud (A free month trial is available at Adobe)
• Internet access (video is streaming)
Every week will be a little different so make sure and check them all out as I release them! If you have never taken Illustrator before (or any of the other programs), it’s ALL GOOD! The tutorials are meant for every level to give you tips and tricks, get you comfortable with the software or technique, and help you in your own business, blog, or personal design endeavors.
This week only, the first tutorial will be 99 cents ALL WEEK. That’s right! Up until next week’s tutorial.
Happy learning!
Carina
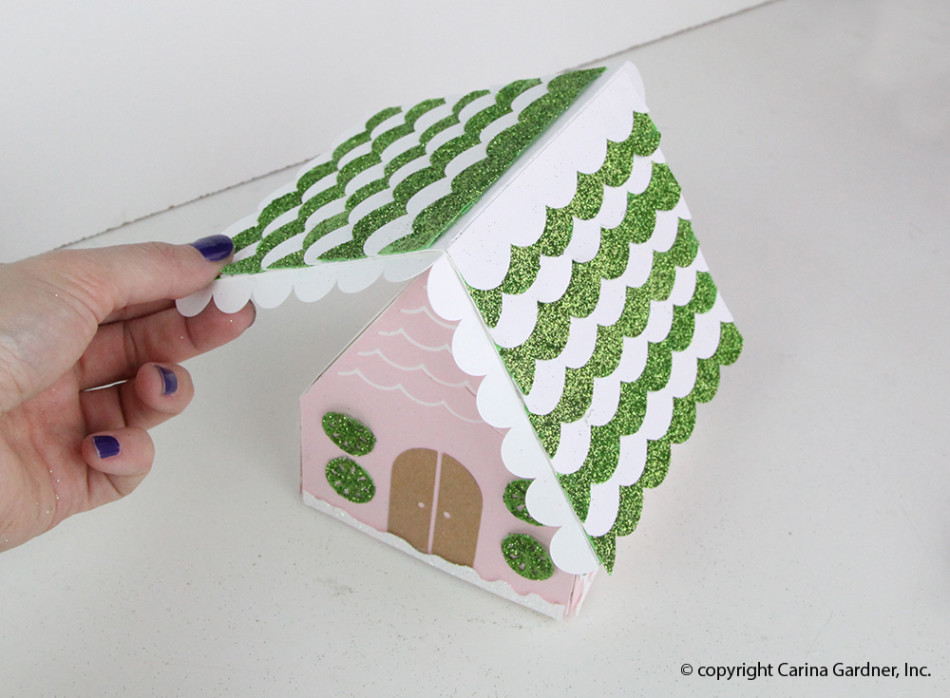
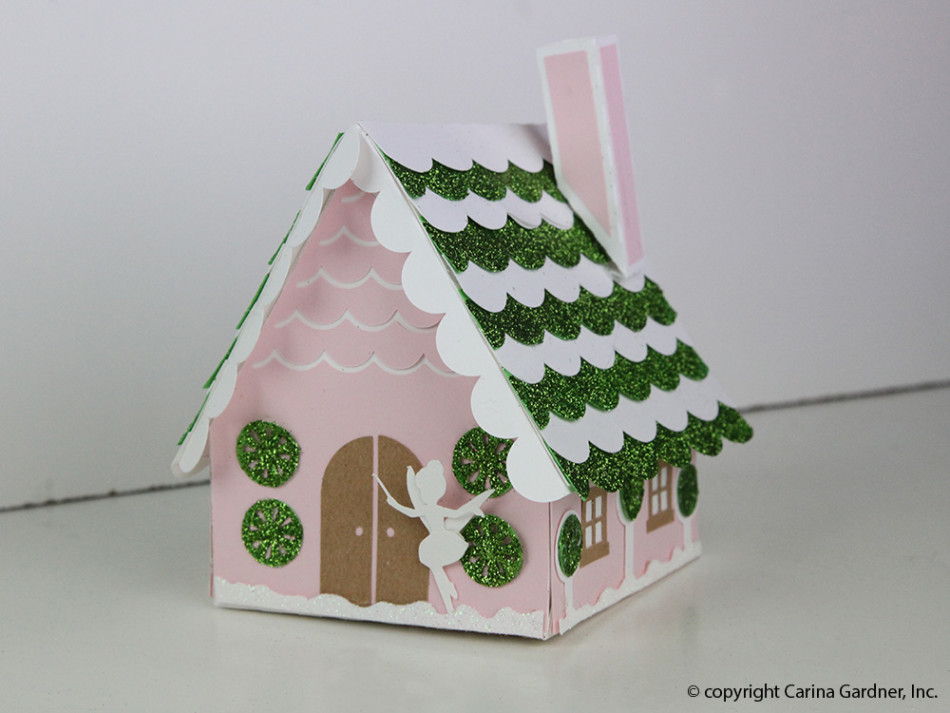
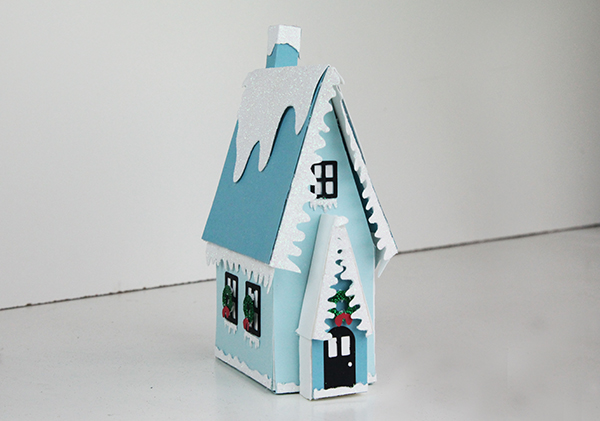
Santa’s Glitter Village SVG Tutorial for Silhouette
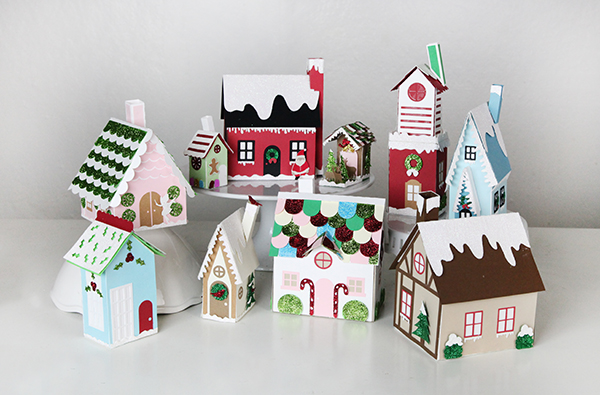
I’m SO excited about the new village I designed this year for Christmas! It’s called Santa’s Glitter Village and you can download all of it from my Silhouette shop! You can add it to any pieces you have from my original Christmas Village or build these separately! There is even a cool download showing you how I made the snowy centerpiece the either village is made on. You can use that for this village too!
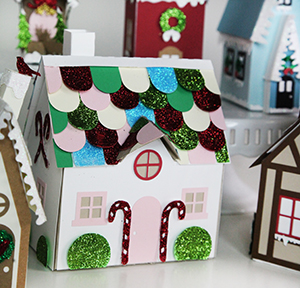 This year it is all about GLITTER! I have a great tutorial for you on how you can put together below. I do NOT have individual tutorials on these houses because many of them are made THE SAME. The tutorial I have below is for the Sugar Plum Fairy’s House and most of the buildings are built in this way. There are also extra instructions below for pieces I thought you might like a little extra help with. So scroll on down to see if there is something there that will help you!
This year, the Santa Glitter Village includes: Santa’s Cottage, Candy Cane Place, a Chapel, Elf Dwelling, Reindeer Stables, Santa’s Tower, Snow Bird House, Sugar Plum Fairy’s House, Tiny Mistletoe House, and the Winter House. Many of these come with openings at the bottom for an electric tea light (or two). The smaller houses do not because a tea light would not fit:).
You can find ALL my tutorials on my main Silhouette landing page here: https://carinagardner.com/silhouette/. I noticed that when I went back to look at previous projects in the Silhouette store, that some of the links are broken. That landing page is your end all for ALL of my tutorials. You can also watch many tutorials I have filmed on my YOUTUBE channel.
I hope you have a wonderful time building Santa’s Glitter Village! Every piece is unique and sweet! I think I’m placing mine on my piano this year.
Happy crafting!
XOXO-Carina

Supplies
-Glitter (we used fine glitter, but you could use more course glitter)
-Mod Podge (we used gloss, but you could use any kind)
-foam brush
-1 piece of copy paper
-SVG card cutouts
Instructions
Note: These instructions work for all of the houses in Santa’s Glitter Village. At the end of the tutorial there are instructions on how to put a few of the more intricate pieces together.
1. Cut out all SVGs provided in the file.
2. Before putting the house together, decide which pieces you want to glitter. I did mine on the green scallop pieces of roof, peppermint swirls, and snow.
3. Once you have all of the glitter pieces and supplies, take a piece of copy paper and fold it in half (this makes it easier to put the extra glitter back in the jar later). This paper will be your working surface to catch the extra glitter and Mod Podge.
4. Next, take your foam brush and dip it in Mod Podge. Cover any area you want glittered with a thin layer of Mod Podge. Put the copy paper underneath to contain any Mod Podge and glitter that goes over the edge.
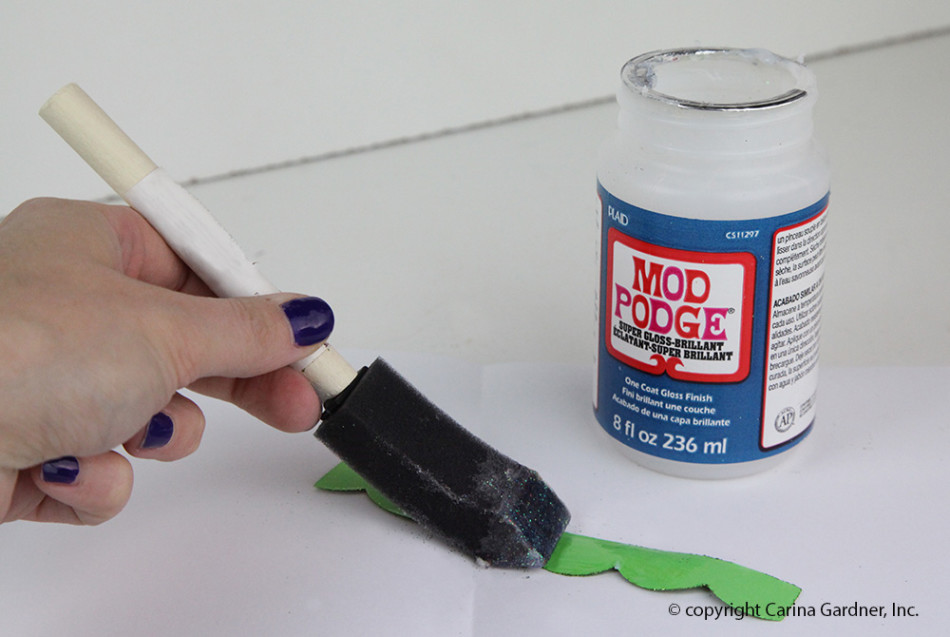
5. After the whole piece is covered in Mod Podge, take the glitter and sprinkle it over the area the Mod Podge covers. Be very generous with the glitter so it covers everything. Remember, you will be able to put the extra back in the container so make sure everything is covered well.
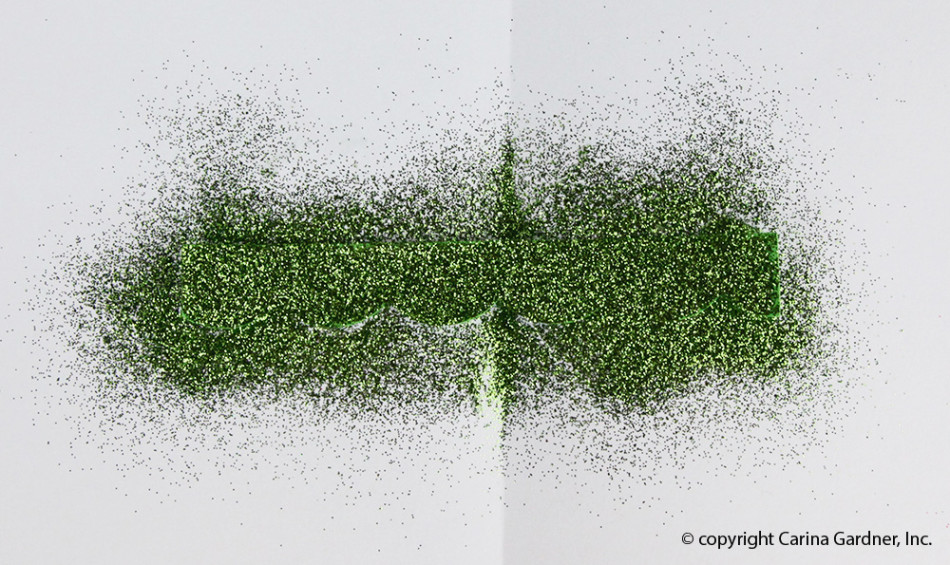
6. To make sure the glitter to stays in place better, use your finger to tap the glitter lightly. This make sure more glitter adheres to the Mod Podge.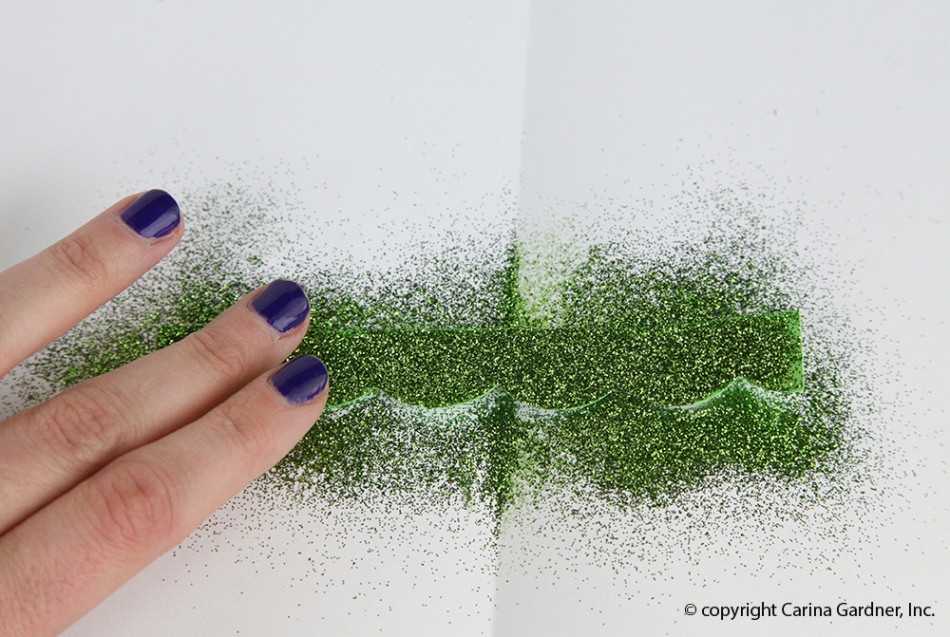
7. Wait for the Mod Podge to dry a few minutes, and tap off the excess glitter.
Tip: If you are worried about the glitter transferring too much, you can put another layer of Mod Podge on top. If you use gloss Mod Podge, the glitter wont lose it’s sparkle.
8. Once you’re done with the glitter, fold the copy paper with the glitter on the inside and pour the excess back into the container.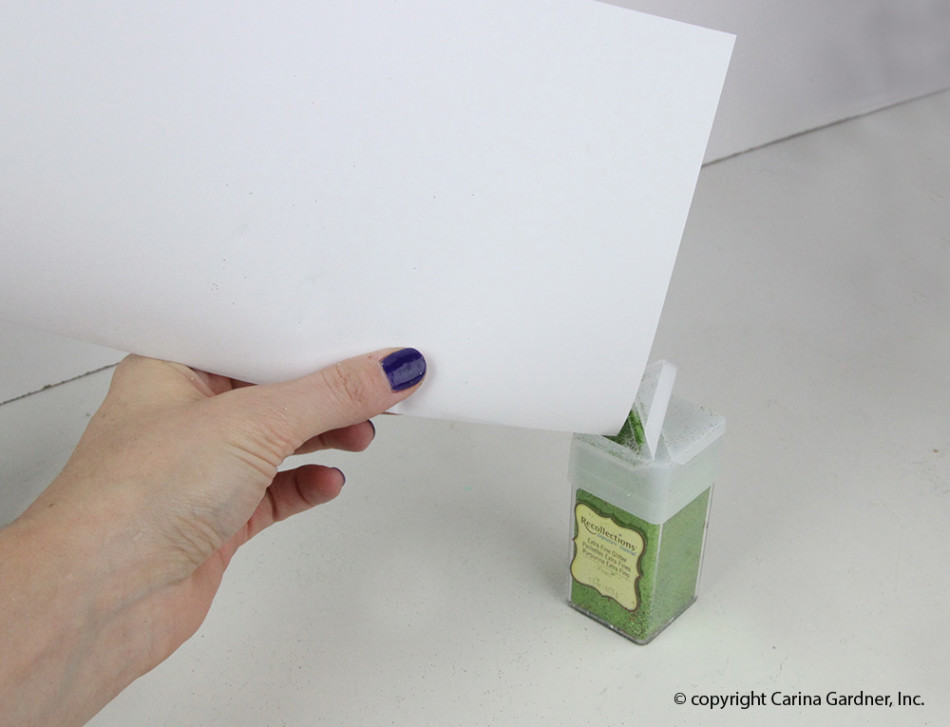
9. You’re done with the glitter, now onto how to put together the rest of the house!
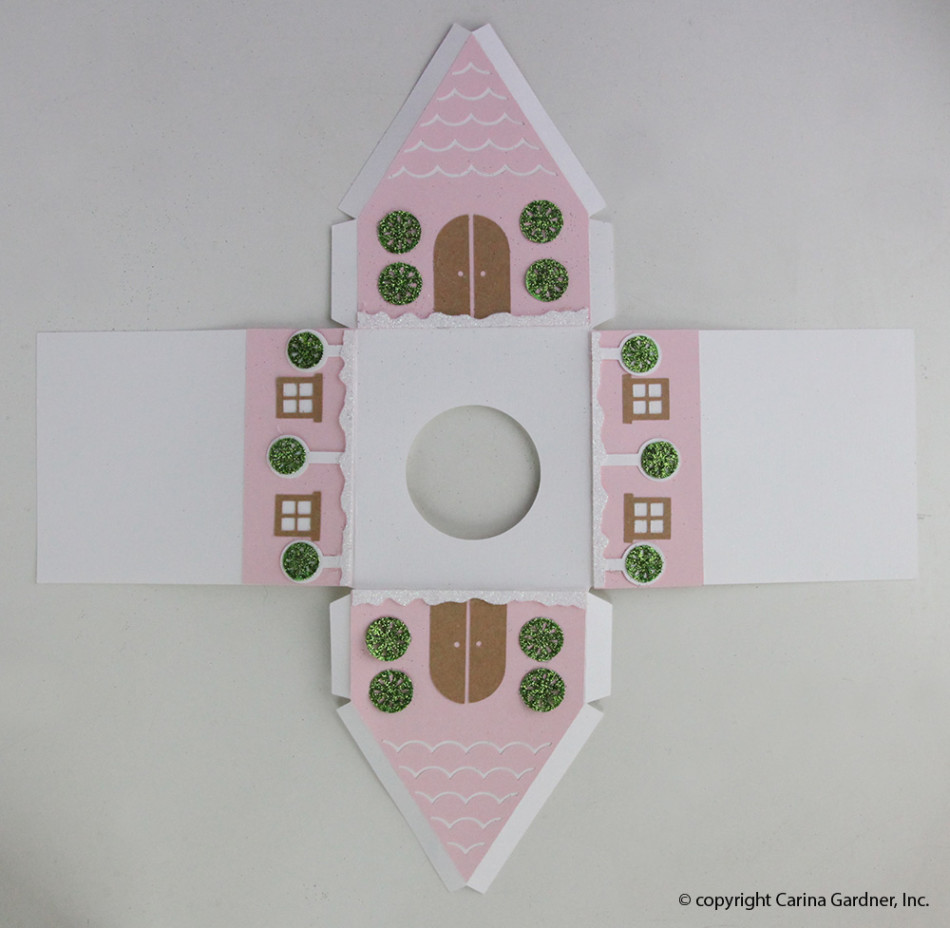
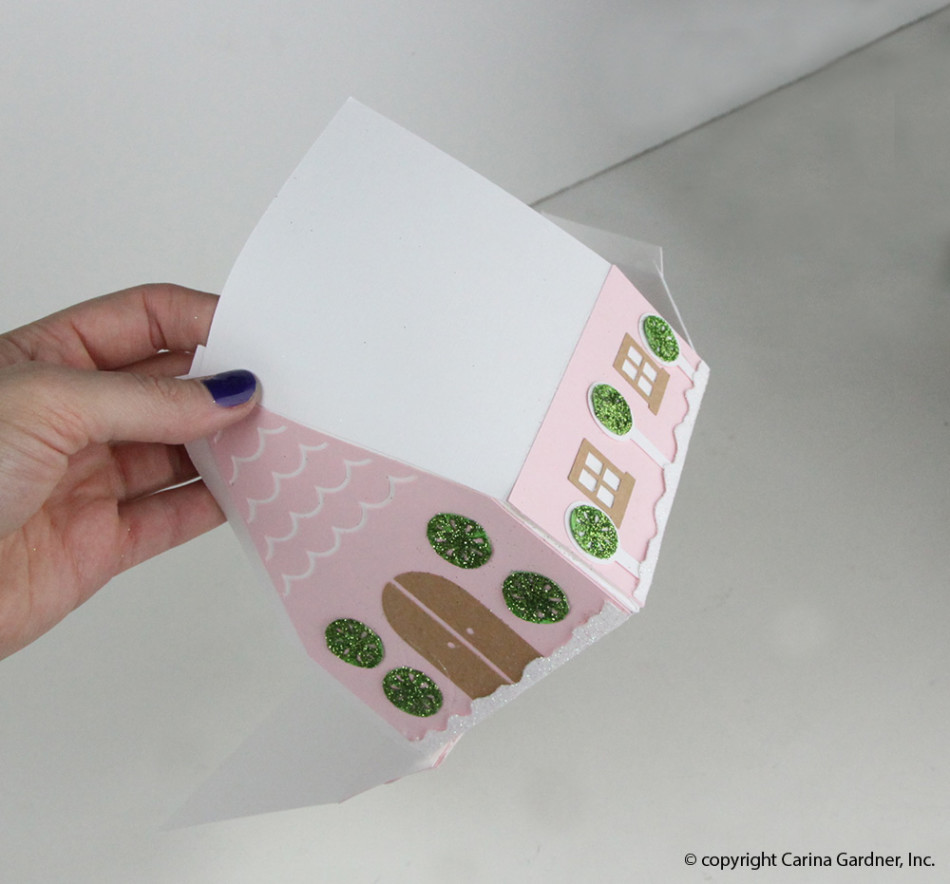
10. To put the house together, first, take the facades and glue all of the embellishments to them.
11. Next, glue the facades to the side and front pieces.
12. Then, glue the tabs of the back and side pieces to the tabs of the bottom. It should form a “T” shape.
13. To make the house 3D, hot glue the tab on the side of the front piece to the side piece. Do this for all of the tabs until you have a house shape.
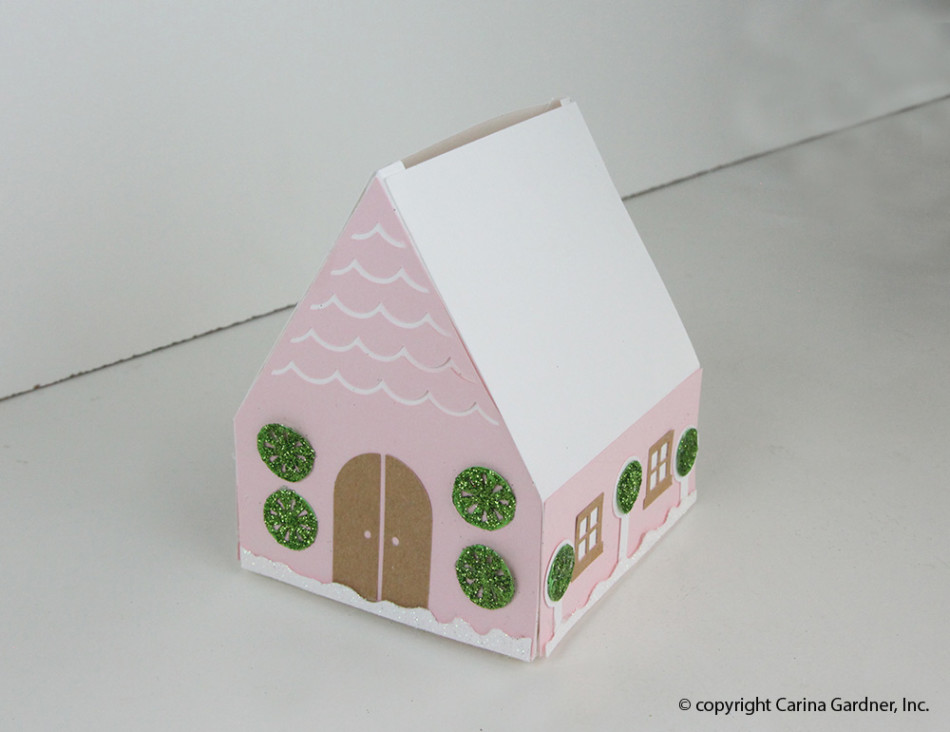
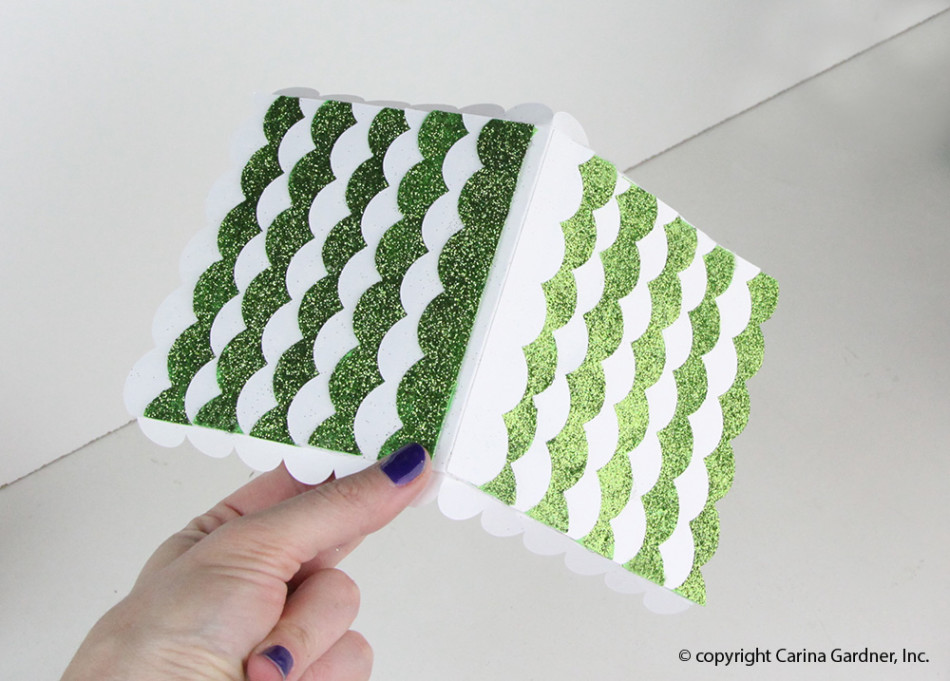
14. After the house is done, gather your roof pieces. Hot glue the scallop pieces to the roof piece. Make sure you overlap each scallop piece and switch off between colors as you glue. It’s best to estimate your spacing before your start glueing so the scallop pieces cover the roof evenly.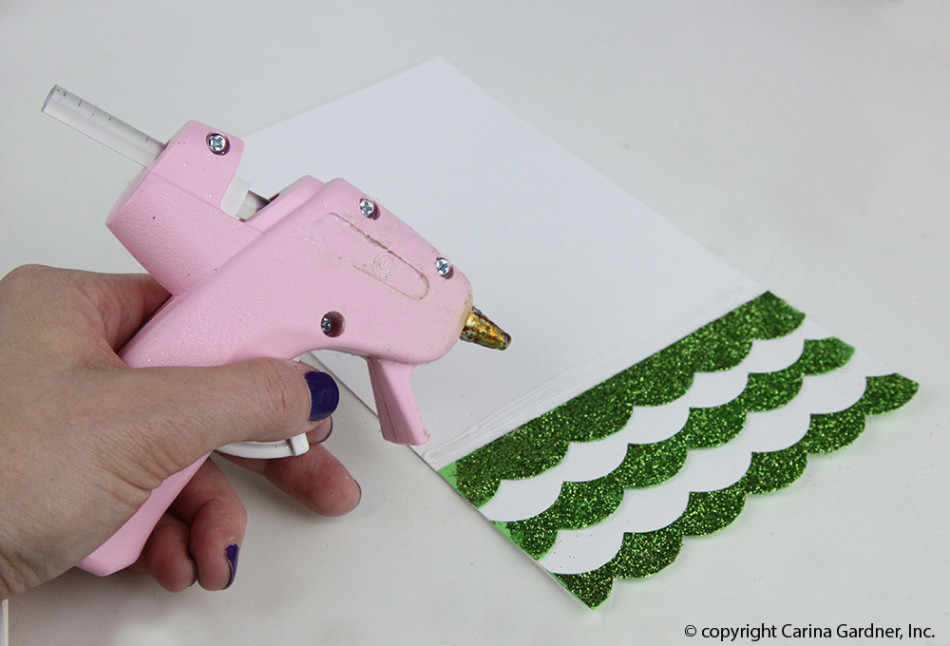
14. Next, add the long scallop piece to the side of the roof by glueing it on the underside of the roof.

15. Then add the roof by glueing one side, making sure it’s centered and the top creased is lined up.
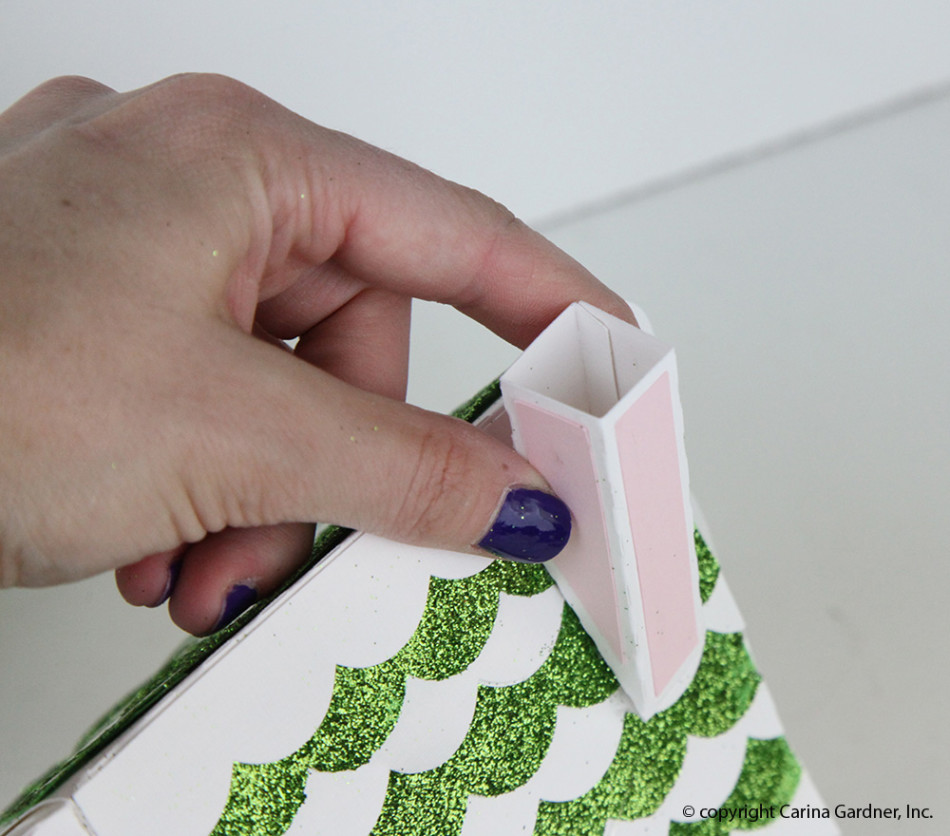
16. The last thing to add is the chimney! Take the chimney piece and fold it into a box shape. Then, glue the tabs on the angled side to the roof.
Now you have the most adorable Fairy House for your Glitter Christmas Village!
Here’s a few more instructions on some of the parts that are specific to each piece.
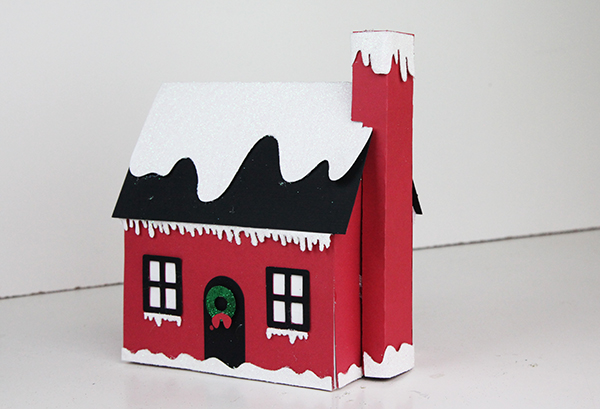
Chimney on Santa’s Cottage:
- Start by folding all of the score lines.
- Next, glue the tab on the long side and glue it so it makes a box.
- Then, Glue the tabs on the open part to the house.
Front Door piece on Chapel:
- Start by adding all of the embellishments to the facade.
- Then, glue the facade to the front/back piece.
- Next, take the long bottom piece and glue the tabs to the front/back piece.
- Add the roof/snow like you would for the other houses.
- To finish, glue the front door piece to the front of the chapel.
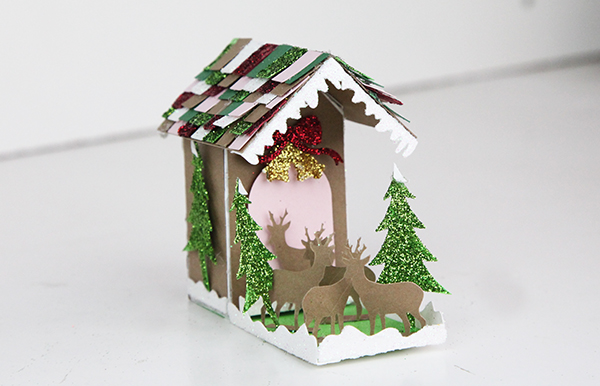
Reindeer Stables:
- Start by assembling the house.
- Then, take the green piece and glue it to the bottom of the house. The green piece will cover the entire bottom of the house and then extends into a yard.
- Next, glue the reindeer and tree tabs to the yard area.
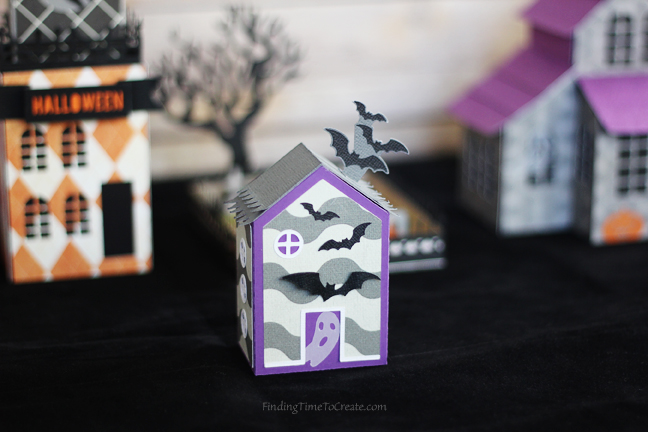
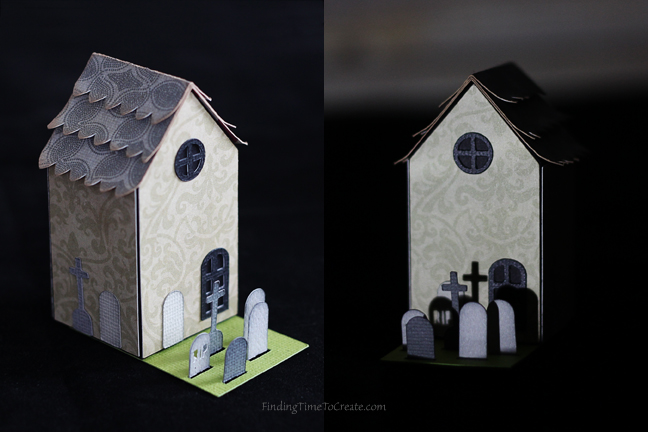
Guest Post from Kelly of Finding Time to Create: Her Adorable Halloween Village
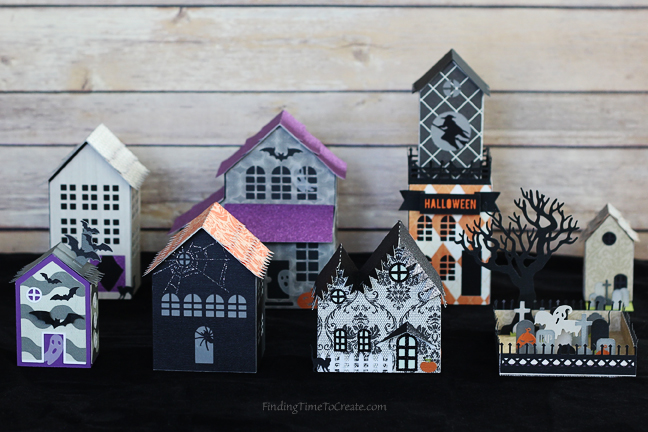
Hello! Kelly here from Finding Time To Create. I absolutely love making paper crafts with my Silhouette CAMEO, so I jumped at the chance to use Carina’s fun Halloween designs this season.
I used designs both from this year’s tiny Halloween village set, and from last year’s Halloween haunted village set. It was fun to mix and match the two sets.
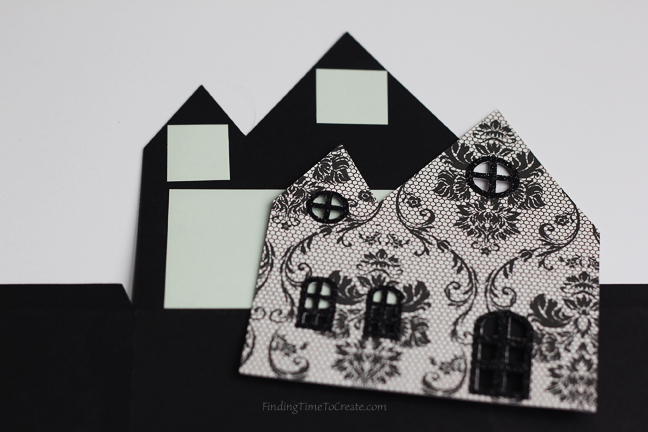
[photo: Halloween Village – Finding Time To Create]
I wanted these to catch your attention in the dark, so I made a couple of the houses with materials that would really pop when it’s dark.
I used vellum as my base for the spider house, which has an opening in the bottom for a battery-operated tea light. That spider on the door looks pretty creepy, don’t you think?
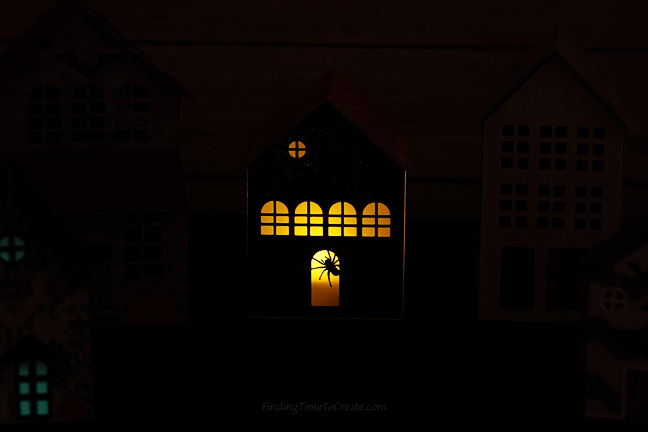
[photo: Spider house night – Finding Time To Create]
On the tiny village haunted house, I backed the windows with glow-in-the-dark sticker paper. It really makes those windows pop! (This house was my kids’ favorite.)
[photo: Glow in the dark sticker paper and glitter heat transfer accents – Finding Time To Create]
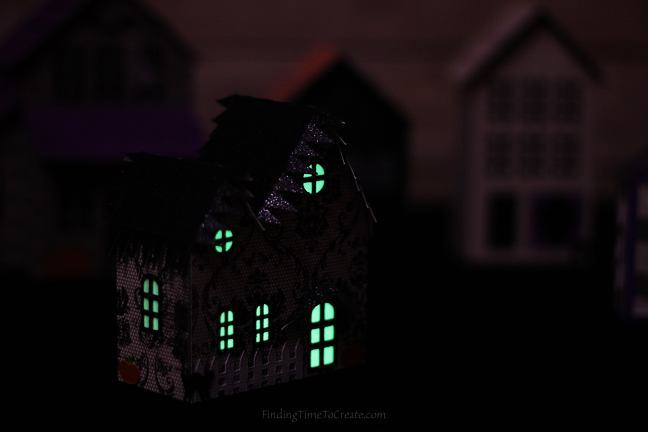
[photo: Tiny village haunted house – night – Finding Time To Create]
Glitter makes every paper craft better, so I also used glitter paper for some of the rooftops, and glitter heat transfer for the spider web and some window frames.
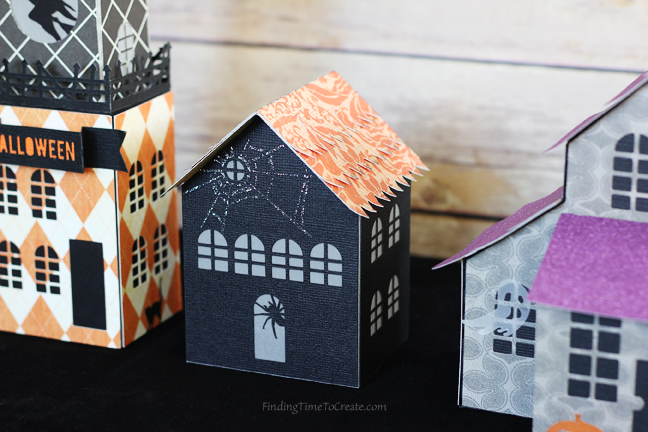
[photo: Spider house day – Finding Time To Create]
You may also notice I cut all the ghosts from vellum, and added a few cats from the cat house throughout the set.
This was such a fun project to make! Thanks for letting me share it with you!
More pictures:
Halloween haunted village – Spooky cemetery and Tiny Halloween village – Haunted tree
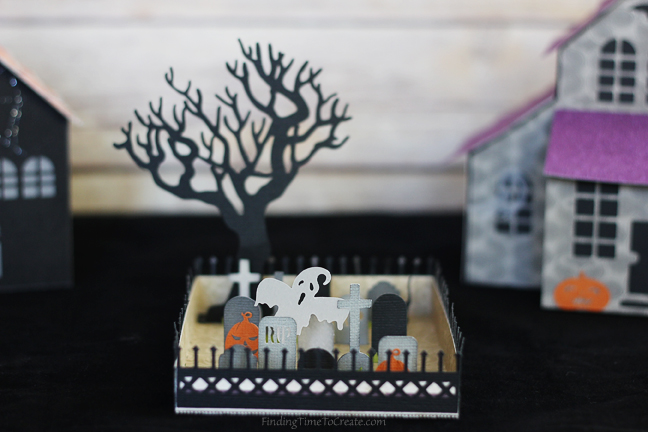
[photo: Cemetery – Finding Time To Create]
[photo: Bitty bat house – Finding Time To Create]
Halloween haunted village – Cat house
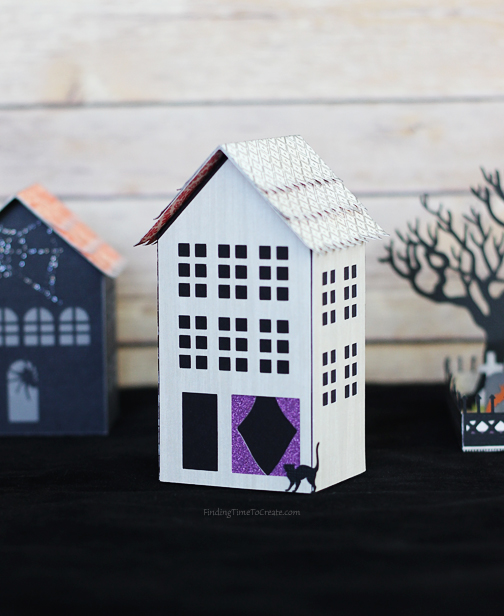
[photo: Cat house – Finding Time To Create]
Halloween haunted village – Ghost mansion
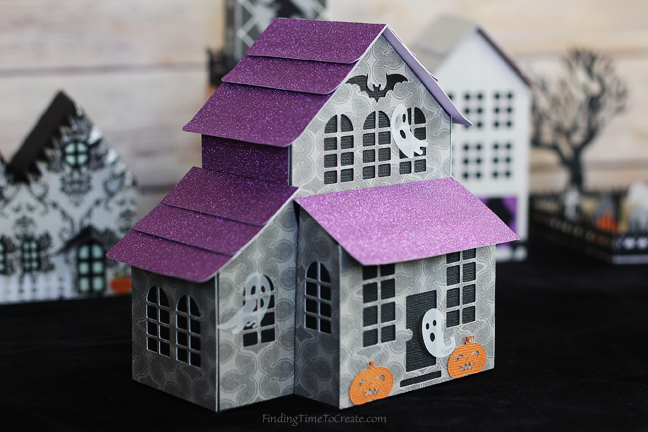
[photo: Haunted mansion – Finding Time To Create]
Tiny Halloween village – Lil graveyard
A huge thank you to Kelly for being on my blog and showing us how she put together her Halloween village! It turned out beautiful!
XOXO-Carina
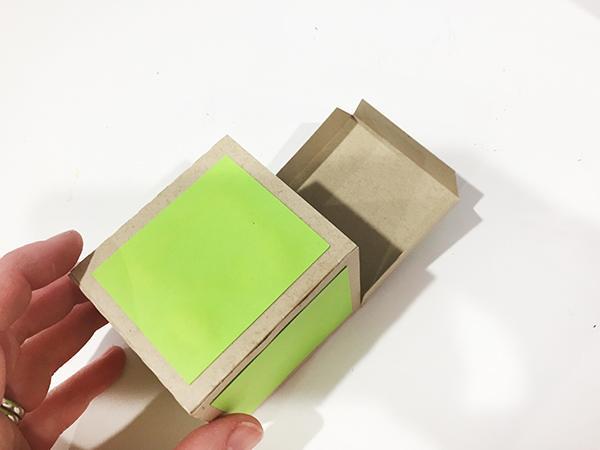
Box Card SVG Tutorial for Silhouette
These adorable box card were released in my Silhouette shop this week! They are so fun to give and receive. You can write an note on them or give them with a present. They fold flat and fit in an A2 envelope so you can mail them easily. They’re pretty simple to put together, and so fun to give! Below is the tutorial for how to put them together.
There are several designs hitting the store for these so be sure to always search MiniLou and box cards!
Instructions for putting together Foldable Box Cards
1. Cut out all SVGs provided in the file. Glue on all the accessories to the box as indicated in the photo.
2. Then, to make the core body of the box, fold the box together, and glue the tab on the inside and fold the flaps down.
3. Next, Take the inserts and fold them into a “Z” shape. Fold one tab backwards and one tab forward.
4. To attach the inserts, use a glue stick for the tabs and place it in the box without sticking the tabs to the sides. When you are gluing the tabs, make sure to keep it in the “Z” shape, so each tab has glue on the opposite sides of each other.
5. When you have the insert where you want it, fold the box flat so the tabs attach. Make sure the top and bottom line up as you do this.

6. Next, glue the second tab on the same way.
7. Add any embellishments, and you’ve got an adorable card to put in the mail!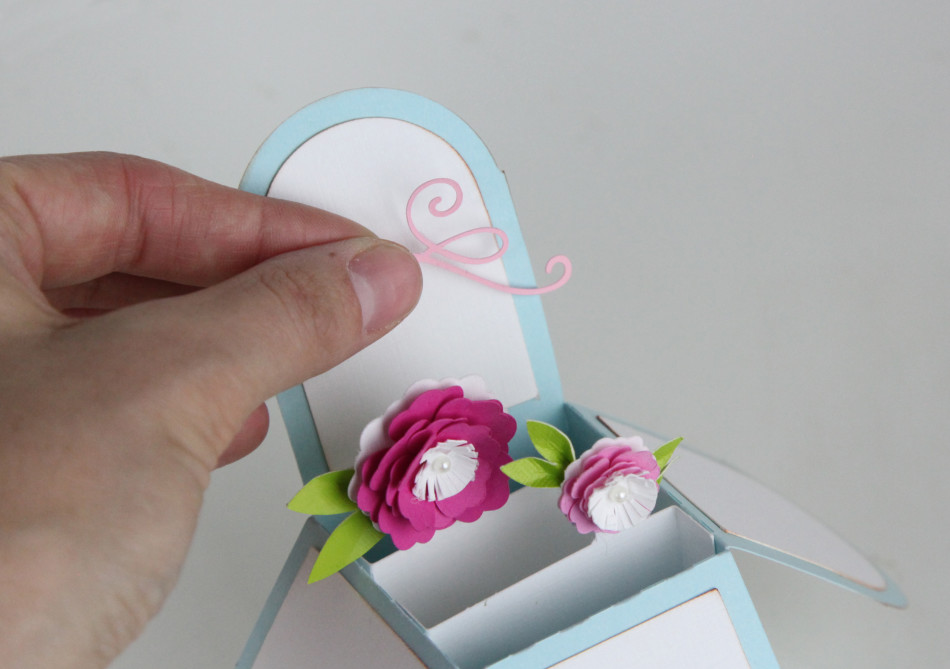
Happy Crafting!
Carina
Halloween Boo Marquee Letters Tutorial
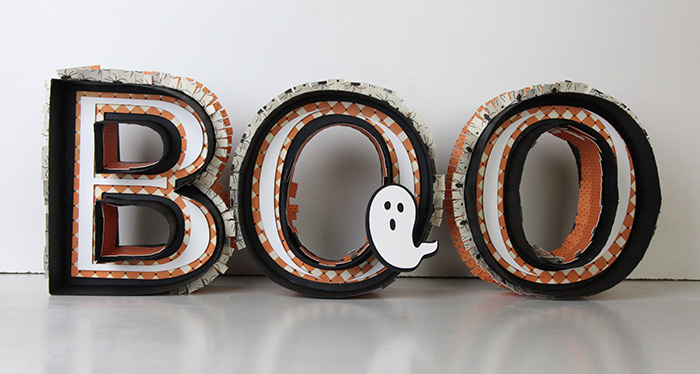
This week I released these fun BOO marquee letters on Silhouette! They take some time to put together, but are so worth it! They are similar to my original marquee letters, but have more decorative element to make them fun for Halloween. Click here if you want a tutorial on how to put the letter part together. You can see how to put together the festive Halloween pieces below. Happy crafting!
1.Cut out all SVGS. We did the letters in black, and the other pieces in fun Halloween scrapbook paper.
2. For instructions on putting the letter together, click here.
3. Once your black letter piece is put together, pop dot the back of the flat letter piece and place it in the letter.
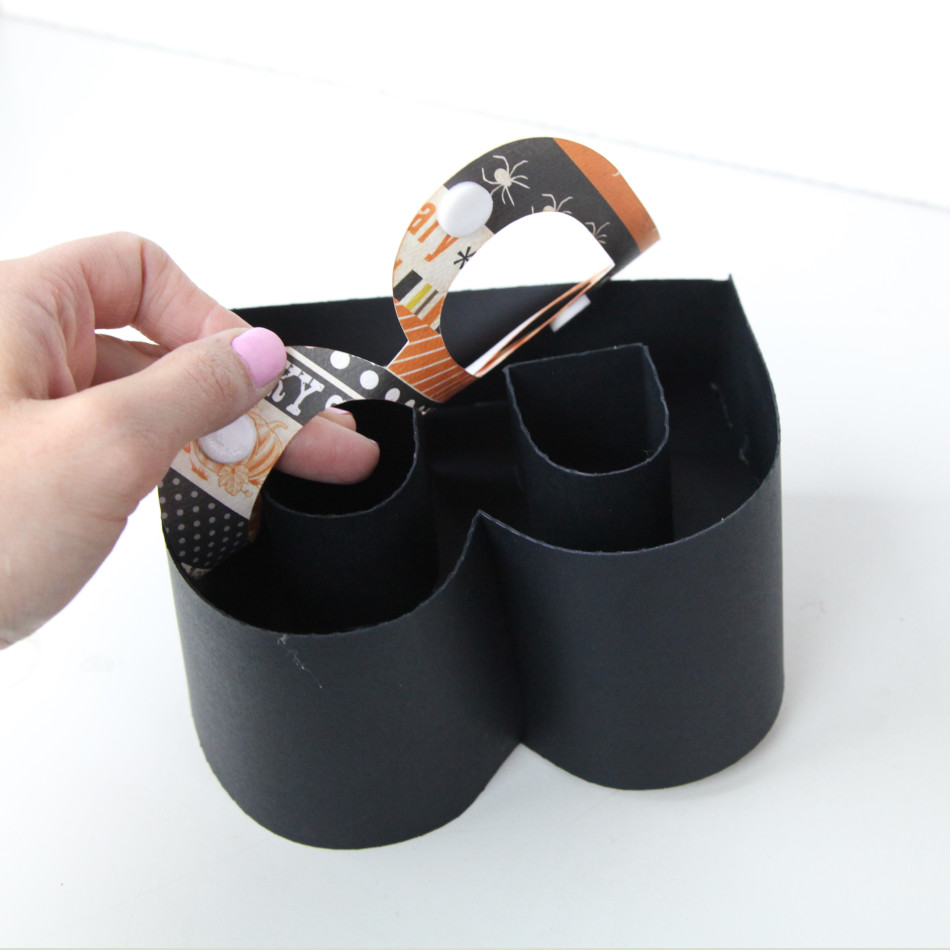
4. After the flat letter piece is placed in the letter. Add the skinnier, flat letter pieces to the letter using pop dots.
5. Once the letter part is done, add the fringe to the outside. Before you start glueing, make sure you know where the fringe pieces fit. Then hot glue down the center to attach it to the outside of the letter. Make sure not to glue the fringe to the letter because you want to be able to bend it up.
6. After all of the fringe pieces are glued down, bend the fringe pieces up.
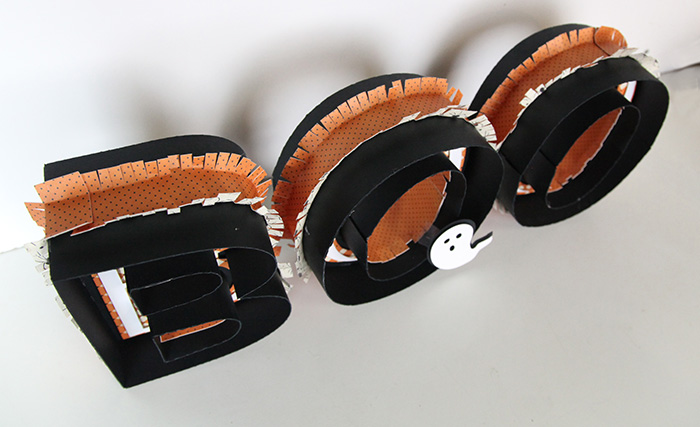
That’s all there is to making the BOO marquee letters! Hope you have a much fun making Halloween decorations as I have!
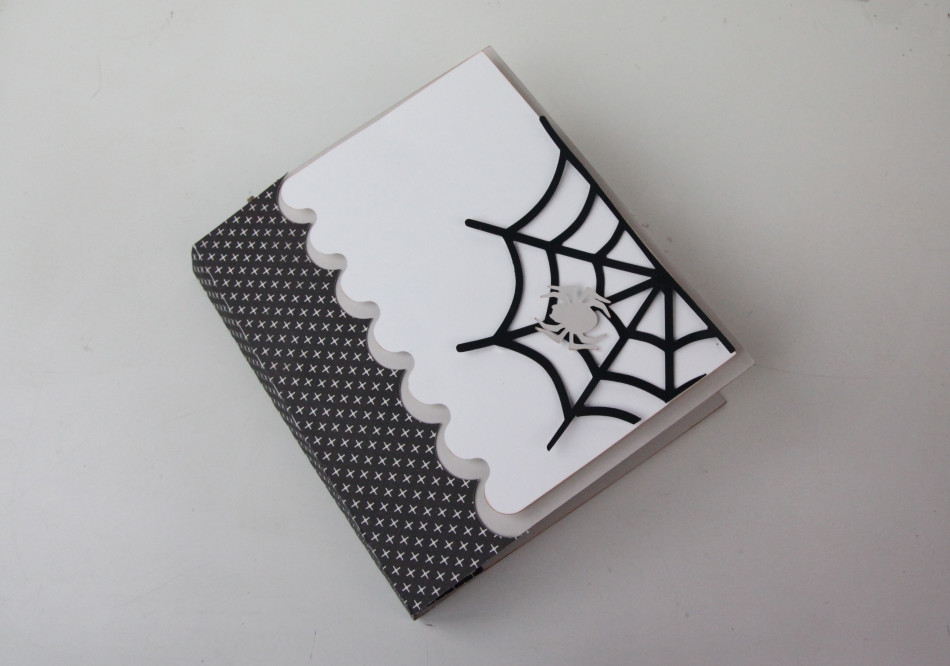
31 Days of Halloween Album Tutorial for Silhouette
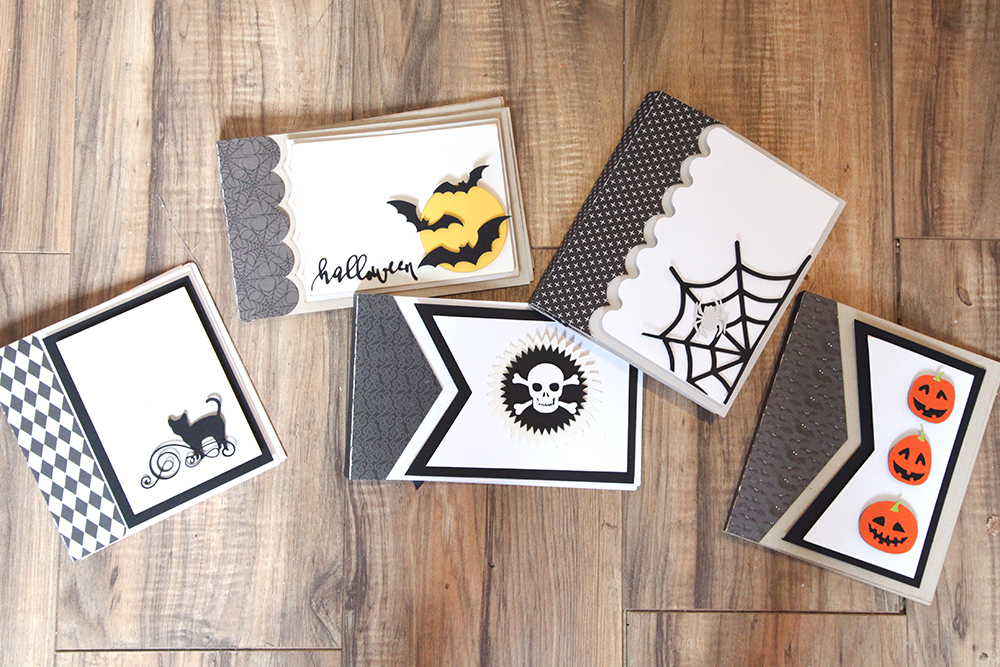
Halloween is almost here! I made some fun 31 days of Halloween albums to document everything going on in October. Each album comes with the cover and details, three binding pieces, pages (one with score marks and one without depending on how flexible you want your album to be), a mat for photos, and a piece the size of a photo (to use for journaling). You can also get the numbers and layouts if you want to accessorize your album!
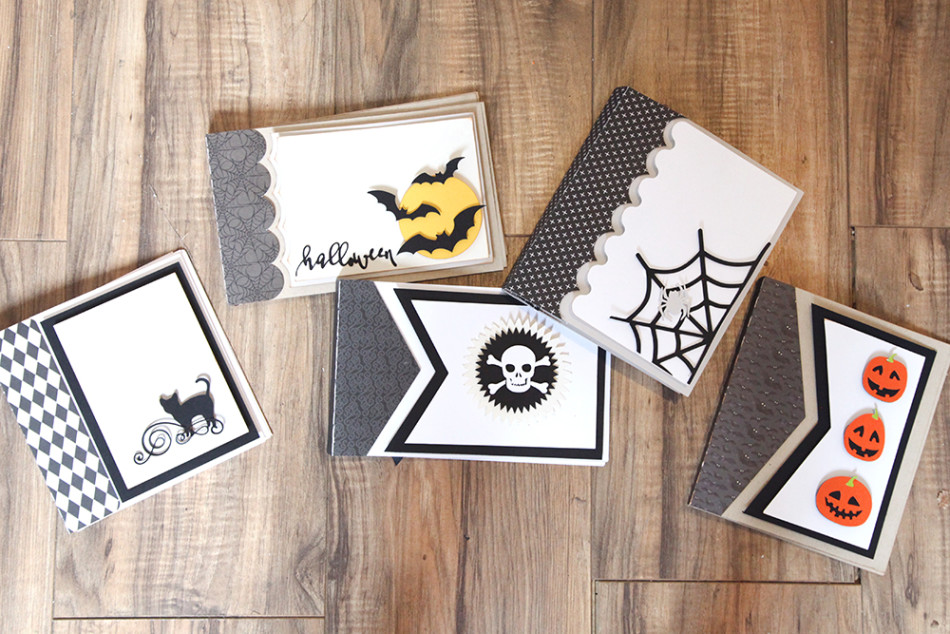
If you want to put pictures in the albums, here is some info on the measurements:
-The skull and cross bone and bat albums are 5 x 8 and fit a horizontal 4 x 6 photo.
-The black cat album is 6 x 6 and fits a square 4 x 4 photo or a 4 in. x 5 in. photo.
-The pumpkin and spider albums are 6 x 7 and fit a vertical 4 x 6 photo.
Here’s the tutorial on how to put these albums together:
- Cut out all SVGS. We used some fun scrapbook paper for the binding to add some Halloween flare.
- Put together the details on the cover. You can use pop dots to give it some fun dimension.
- Next, take the cover and glue it to the binding piece. The edge of the cover should go to the score line.
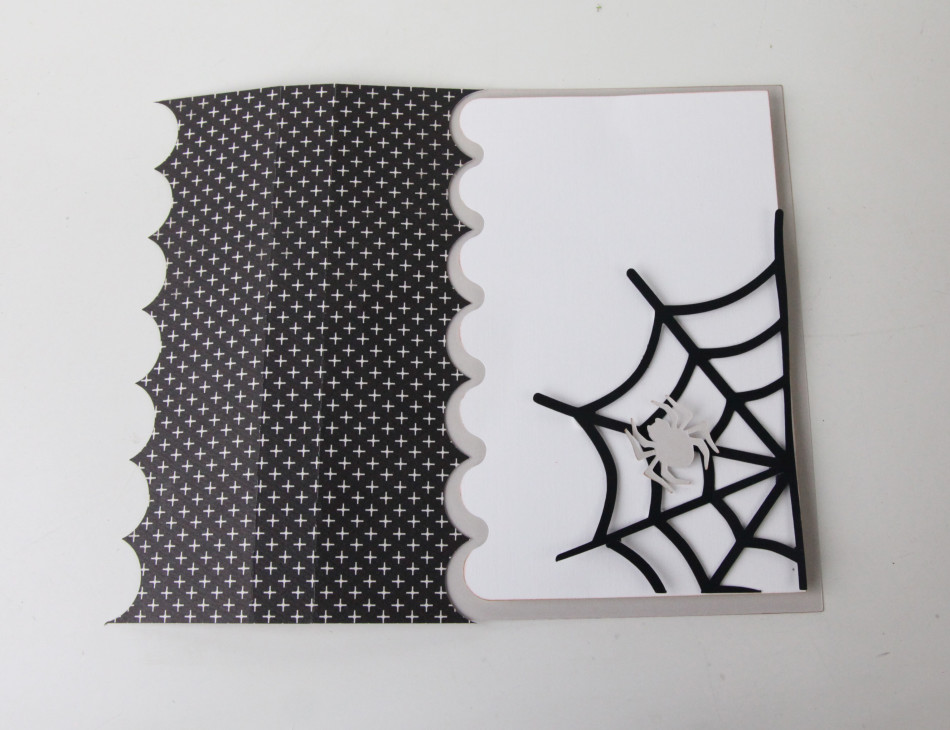
- Next, glue the scalloped half of the inside binding piece to the back side of the cover. The score lines should match. Leave the side with the page holes free so you can use it to attach the pages later.
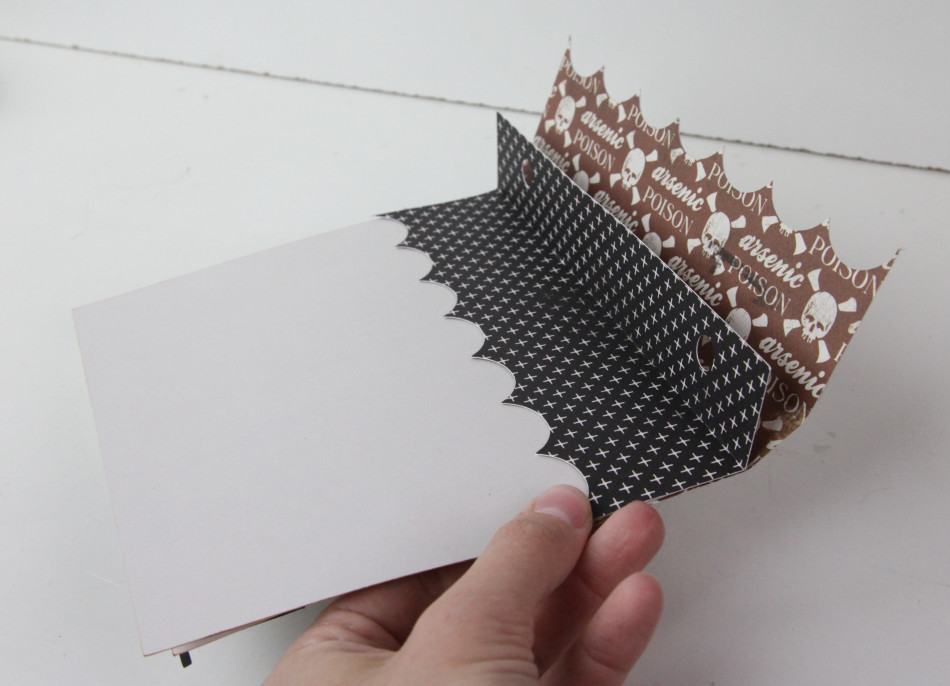
- Do Steps 3 and 4 again for the back cover.
- Now that you have the cover done, take the pages and align the holes together. Use a ribbon to secure them into the holes.
That’s all there is to these adorable Halloween albums! Now you can add your pictures and memories for the 31 days of Halloween!
Happy Crafting!